
The only thing I love more than making handcrafted projects…. is gifting handcrafted projects. This easy cookie sack project is one of my favorites and I think when you see how simple it is to make, you’re going to love it too.
In this, Day 16 of my 25 Days of Christmas holiday series I’ll not only walk you through the construction process but I’ll also share a few of my earlier versions of this adorable gift cookie sack.

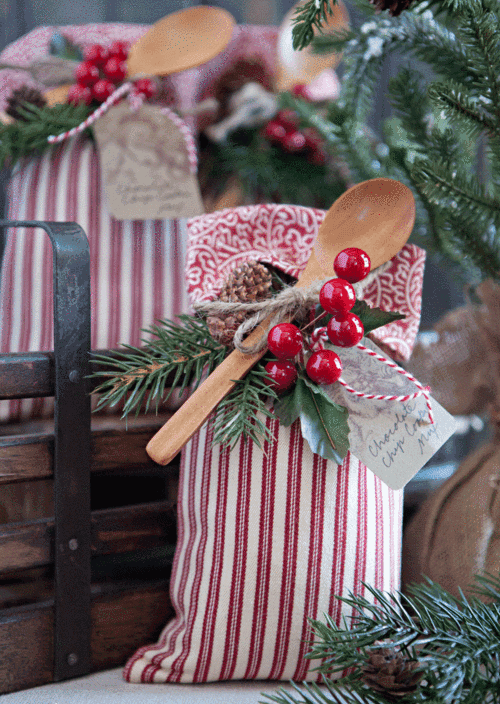
Look how pretty these sacks look lined up all ready to be handed out to friends and loved ones.
I think you’ll find yourself making these cookie sacks over and over again.
MY HANDCRAFTED COOKIE GIFT SACKS FROM SEASONS PAST

Allow me to share a few of my earlier incarnations of this cookie sack which can be tailored to suit any season or occasion.
Here’s a look at the cookie sacks I made last year.
Several years ago, I made these cookie sacks and embroidered a Hummel image on the front of some of the sacks and hot-glued fabric ornaments on others.
These made for wonderful teacher gifts that year.
TIP: You could also just make plain cookie sacks without any embroidery and very little embellishment for a very simple but elegant presentation.

That same year, I also made personalized aprons with matching embroidered image to gift along with the cookie sack for several elementary school teachers.
They adored the gift set and really appreciated the handcrafted effort.

Here is one more version of my fun cookie sack that I made earlier this year as a contributor project for the digital magazine, Celebrating Everyday Life with Jennifer Carroll.
As you can see, you can change the tone of the cookie sack to suit any time of year depending on the fabric and embellishments used.
NOTE: I’ll share more photos of these burlap cookie gift sacks later in an upcoming post.

OK, getting back to the holiday cookie sacks this year, I’ve changed the sacks up just a bit this year by using contrasting fabrics so that the top of the cookie sack is different from the lower portion.
Start by cutting two strips from each fabric that measures @6-inches wide by 13 inches long (if using contrasting fabrics.
NOTE: If you are using the same fabric, meaning you are NOT using contrasting fabrics, cut the fabric 6-inches wide by 25-1/2 inches long.
With right sides together, sew two contrasting fabrics together along the shorter, 6-inch edge.
Use a 1/4-inch seam allowance.
Repeat with second set of contrasting fabrics.

This is what the seam of the the contrasting fabrics should look like when sew along the short 6-inch edge.
Pin right sides of these two fabrics together, making sure fabric patterns are matched on both sides, and stitch 1/4-inch seam all the way around the fabric leaving one 6-inch wide edge open.
The 6-inch edge that remains open is the fabric that will be seen at the top of the finished cookie sack.

Turn the sack inside out (like a sock) which will give you one long tube.
Turn the open edge of the sack over about 1/4-inch and top stitch across the top… closing the opening.

Push the edge you just top-stitched down inside the tube which creates the sack.
Fold the top edge over about 5-6-inches and iron.
You have now created a lined, cookie gift sack which you can fill with pre-packaged, store-bought cookie mix.

I think the thing that really makes these cookie sacks sing, is the variety of embellishments used to decorate them.
Jute, baker’s twine, artificial pine needles, holly berries and mini wooden spoons are just a few holiday-themed additions I incorporated.
NOTE: I found these woodens spoons years ago at Joanne fabrics and crafts. However, you can also find the spoons on line if you google mini-wooden spoons.

Use a punch to cut out tags from khaki-colored cardstock.
Add a rubber stamp image and hand letter a description of the cookie sack contents.

I always fill my cookie sacks with store-bought cookie mix because it’s just easier since the boxed mixes are already packaged and sealed.
Make sure you make multiple copies of the cookie mix instructions from the back of the box.
Slide a copy of the instructions down into the back of the cookie sack so gift recipients will know what to do with it.
Use jute to attach all the festive embellishments to the cookie sack.
Tie the tag in place using a small piece of peppermint-colored baker’s twine.

I think this is the kind of handcrafted gift item you will find yourself making over and over again.

It’s so simple and it makes for such an original and unexpected gift.

Day 16 down, 9 more days to go.
We’re getting close to the end of this holiday series but I still have more to share. Stay tuned for more inspiration ahead.
If you missed any days in this series so far, here’s a look at:
Day 1|Day 2|Day 3|Day 4 |Day 5|Day 6|Day 7|Day 8 |Day 9|Day 10 |Day 11 |Day 12 |Day13 |Day 14 |Day 15
 Hope you stop by again tomorrow (12/17) for Day 17 of my 25 Days of Christmas series.
See you then. ♥
I’m linking this gift cookie sack project to the following:
I love these sacks and have already made some to give this year. I just saw these with the contrasting fabric and would love to know where you found the red and white floral pattern. Thank you so much for the tutorial, these are so lovely!
Thanks Heidi, I’m glad to know you’ve already made a few sacks to gift. I found the red-striped ticking fabric and the floral fabric at JoAnne’s. Don’t forget, you can change the fabric to suit the season and gift these any time of year. Search my blog and you’ll see the burlap ones I did for spring.
Happy holidays!
Where did u find the Hummel embroidery? I have an embroidery machine and would love to use this.
Hi Rita, thanks for popping by. A friend gave me the embroidery designs and I’m not sure where she found them.
However, if you google Hummel embroidery design a designs from this collection come up online and on ebay. I’m sure you’ll be able to find what you’re looking for.
Good luck and have a wonderful day.
I tried following the instructions but ended up with a much longer sack than your pictures showed – 25 inches tall by 5.5 inches wide, while your pictures look only 15 inches tall. Is there a step I’m missing? I was going off the text of directions since not all pictures are loading.
Hi Jenny, did you push one end of the sack inside the other?
Yes – it looks exactly like yours just 25 inches long. There should be 4 pieces of fabric, two of each color, all 6 inches by 25.5 inches right?
I’m also wondering why you would need four pieces of fabric for one sack. I think I might be missing a step too. Could you please elaborate on the directions one more time? Thanks so much. They are so cute looking and I would really love to try to make one.
Hi Shirley, I’m so sorry there is some confusion about the instructions.
You need four pieces of fabric because there are two pieces of fabric that are sewn together as the “outside” portion of the sack and then another two pieces (of contrasting) fabric for the inside.
Once you sew them together, one end fits down inside the other and the edge is folded over to create the cuff.
Does that make sense?
If you’re still stuck, send me an email and we can exchange phone numbers and I can face-time you to walk you through it, if that will help.
In the meantime, I’ll take another look at my directions to see if I can make everything more clear.
I’m so glad you’re interested in making the cookie sacks.
Happy holidays!
Thanks so much Lisa for your quick response. You are very kind and sweet. I will give it a try! 🙂
I too followed the instructions to a tee and the bag is sooo long, more like a wine bottle bag but not wide enough to fit one. The measurements must be wrong. 25 1/2 inches is just way too long.
Hi Kaye, the length of the bag is long but will be cut in half when the top of the bag is pushed down into itself.
Picture folding a sock inside out.
This is the same concept used when creating the bag.
You basically have a long tube. Take the top of the tube (top of bag) and push it down inside itself (inside the tube) so that it meets the bottom of the tube (bottom of bag).
By pushing the tube/bag down into itself you end up with a lined bag half the original size.
Also, because I made these bags to contain pre-packaged cookie mix, the plastic bag the mix is in is very flexible and should be able to fit into the bag if you manipulate it a bit.
If you’re still having trouble, private email me your phone number and I’ll call you and try to walk you through it.
Happy holidays.
Hi Lisa,
Thanks so much for your reply, I cut all pieces 25 1/2 inches long so my finished bag is 25 inches long, so getting my head around it, when sewing the 2 strips together, they should be 25 inches in total, then when pushed inside, finished length would be roughly 12 inches? I tried that and now have the cutest little bags. I’ve made a heap of them and I love them (don’t want to give them away lol) I guess really, they can be made to any size wished – Thanks for a lovely page and lovely ideas! Merry Christmas x
Kaye, I’m so relieved.
Yes, you can certainly adjust the bags to whatever width you like to accommodate an assortment of contents.
I’m going to have to put together a short video to go with that cookie sack post because you’re not the only one who gets stuck in the same place (smile).
Don’t forget, you can also switch up the fabric to go with various seasons too. Here’s a link to the same cookie sacks I made for Springtime. The sizing may be slightly different but the concept is the same:
http://celebrate-creativity.com/my_weblog/2014/03/spring-cookie-mix-sacks.html
Good luck with your future projects and happy holidays.
Where did you purchase the wooden spoons?
Hi Cindy, I found the wooden spoons at JoAnne’s Fabric and Crafts stores several years ago.
Since then, I’ve seen them online at various shops.
Just google “mini wooden spoons” and you should get some good options to choose from.
Happy holidays.
Super easy to make. I made mine reversible by hand stitching the open end. Thank you for sharing your idea.
That’s wonderful, Lori.
I’m so glad you’re happy with the way your cookie sacks turned out.
Gift recipients will really enjoy them, especially when they find out you handcrafted them.
Happy holidays to you.
Did you use decorator fabric or calico? They are so pretty. Will make a bunch for this year. Did you ever make the video you spoke about?
Hi Jackie, so glad you like the project.
I used a cotton fabric called “ticking”. You can find it at Joanne’s.
It comes in several colors, most commonly in red striped and blue striped, but I’ve also seen it in green (although green is a little harder to find for some reason).
I never made that video but I’m going to try to make one this holiday season. Thanks for the reminder (smile).
Thanks for popping by. Good luck with your cookie sacks.
xoxo
I’m a fairly experience seamstress but am having difficulty with the directions. I made one sack and as others have commented it is twice as long as it should be. Here is my email if you could reach out for further instructions it would be great appreciated. I’m sure I’m just missing a step. My email is llearned57@gmail.com
Thank you.
Laura Learned
Hi Laura, I’m sorry you’re having trouble with my instructions. You’re not the first, so, clearly, I need to adjust the instructions.
If the sack is twice the size, try taking one end and shoving it down inside itself to create the lined sack.
I’ll also email you.
xoxo
Thanks Lisa for all your help today! I’m anxious to get the sacks made for the holidays!
Laura
My pleasure, Laura.
I’m so glad we finally got it all figured out.
Good luck making all your fabulous sacks for the holidays.
xoxo