
I’ve got a thing for pincushions, all kinds when they’re handcrafted. They can be apple shaped, pear shaped, pumpkin shaped or even teacup shaped, it matters not.
I have loads of handcrafted pincushions because they’re so much fun to make and even more fun to gift.
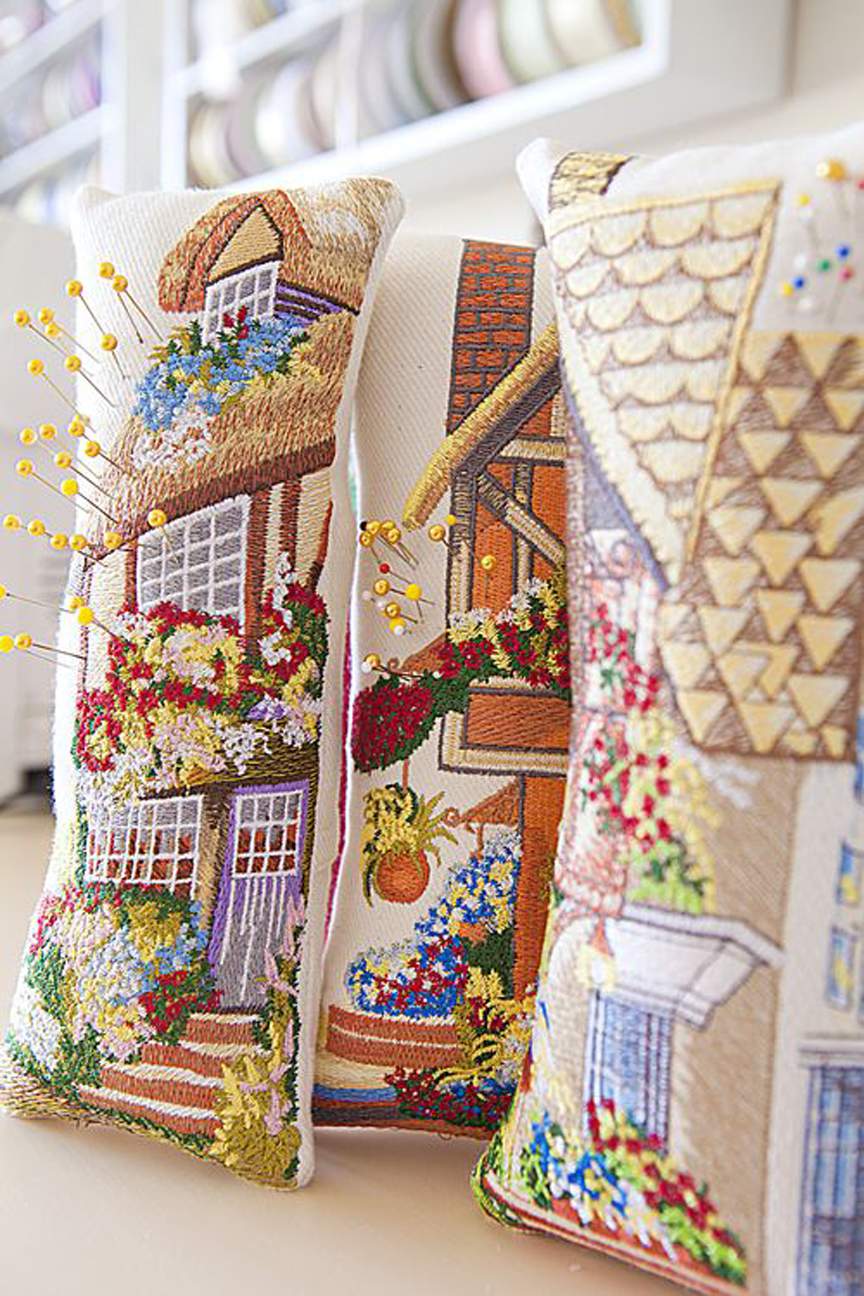
Inspired by old fashioned dwellings, check out these lovely cottage pincushions.

The design was created using an embroidery machine, but with some patience you can also achieve a similar result using hand embroidery.
Whether embroidering by machine or by hand, I suggest selecting a design that has very dense, tight embroidery elements to produce a fine, needlework appearance that will read like tapestry.

Before I share the details of this project, allow me to share the inspiration behind it.
While flipping through some pop, art books recently, I came across some work by Thomas Kincaid and his work reminded me of some old cottage-themed embroidery discs that I had tucked away.
The designs featured on my rectangular pincushions are from an embroidery collection called Cottage Scenes. I’ve had this disc for at years but never got around to using it.
One of the many things I love about writing a crafts/lifestyle blog is that it forces me to dig up, dust off and actually use supplies and software that I’ve collected over time.
Here’s another cottage designs collection that I used for a similar but smaller, square pincushion.
You can see the square version further down in this post.
Perhaps I’ve mentioned before that I never get tired of seeing an embroidery design stitched out by machine. It’s always amazing to watch the design come to life.
I love how the splashes of color build upon each other with every change in thread color.
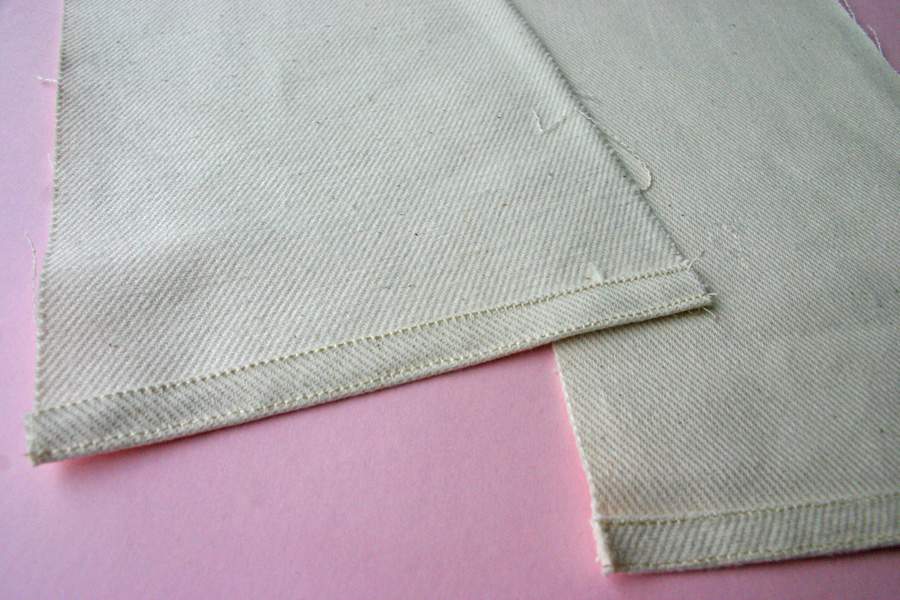
My pincushions have an overlap, back flap, which is easy to construct. You’ll need two pieces of canvas cut in equal width as the embroidered section. Each piece will measure @ half the length of the embroidered section, plus @ 1/2-inch.
On one end of each piece, simply fold over 1/4-inch and press, fold another 1/4-inch and top stitch.
Your pieces will look like the photo below.
Overlap one piece over the other about 1-inch with raw edges facing the outside. Pin at center to hold in place. Match up the length of back section (B) with the length of the embroidered section (A). Trim raw edges if necessary to match lengths.
Pin both back pieces over the embroidered portion and stitch together using 1/2-inch seam.
Once the design has stitched out, pin right sides together and stitch all the way around. Again, you’ll need to trip the excess so both A and B match up lengthwise.
Stitch all the way around the rectangle.
Ordinarily you would need to leave an opening in the seam to turn inside out. However, this open back-flap technique eliminates the need for that.
Once the piece has been stitched all the way around, simply turn the project inside/out through the overlap back flap opening.
Tightly stuff the pincushion with cotton. You can use the point of a knitting needle to push the cotton into the corners.
Here’s a look at the back of the stuffed pincushion.
All stuffed and ready to be adorned with pins.
Ultimately, the size and shape of the pincushion is dictated by the size and shape of the finished embroidered design.
Here’s a look at a square version of this project using a smaller embroidered image.

I love the “folksy” cottage look of these pincushions and I think they’ll make great gifts for my friends who are sewing enthusiasts.
My mom, Nana Banana has already laid claim to one of them.
Thanks for stopping by.
See you back here next time. ♥
Lisa these are absolutely gorgeous!!! I so agree with you about watching the change of colors transform a plain piece of fabric into a beautiful picture! I have a machine embroidery business and get to work on new projects every day! It never gets old. Love, love, love your pincushions!
Those at super cute Lisa. You’re so clever! I love to get embroidery designs but I often can’t think of anything to make with them – these are perfect!
So beautiful, Lisa. I was just doing a bit of research on Amazon.com and saw that a new craft book devoted to making pincushions will arrive in Spring 2012. Did you contribute? Anyway, this idea has me thinking I may want to invest in an embroidery machine. Thanks for sharing.
You ALWAYS do stunning work!!!!!!
What a fun tutorial! I have recently discovered quilting (that’s how I found you BTW) and I’m hating my magnetic pin holders because I invariably get stabbed trying to get a hold on a pin! Fabric and stabbed fingers do not play well together. I will do this this morning. Thanks!
Wow! That’s a lot of thread changes. Those designs are incredibly detailed. Great pincushions. I have some fairly detailed Hummel embroidery designs that I’m dying to use. I never thought of using them on pincushions. Great idea. Thanks for the tutorial.
Thank you for sharing.
Sweet little pincushions! I would love to have an embroidery machine, but alas, there are far too many other things I “need” 🙂 The pincushions are really lovely!
These are impressive Lisa. I love the machine embroidered idea but wonder if I am a little to antsy to do it by hand. Love the long rectangular shapes you worked up.
http://mel-designs.typepad.com/my-blog/2012/02/wool-felt-bird-wedding-decor-1.html
Does Nana Banana arm wrestle? I want those cushions!!
Fabulous!!!You did a great job!!!!Thanks for sharing it
Its very lovely pincushions !! In this cushions work and picture is too good as well as fabric is so smooth. I like this post.
Its all nature picture is cool and wonderful. You have done great work on pincushions with best fabric and embroidery work.
Wow you share such beautiful images with us. Its wonderful pincushion you make it. Its looks very attractive and fabulous as well as You have done great work.
Wow what a great idea. i have no i words to say about it. I have only one word to say for this “Awesome”. I love your idea and the great work.Its so impressive , fun tutorial and absolutely gorgeous. I am dam sure every one love this kind of stuff and this great embroidery which you have made cleverly.
Wow! What a great collection of awesome embroidery pieces. Thanks for sharing.
do you have hummel designs which have boys in them
Hi Norma, I think some of the Hummel embroidery designs do have boys in them.
I’ve seen the designs online via Etsy and Ebay.
Here’s a link to a Pinterest entry that features a popular collection you may be able to find online.
https://www.pinterest.com/pin/195343702565264804/