
For years, I used to pass by the boxes of clear plastic ornaments in the craft store and never thought much about them.
Well, I’ve definitely changed my perspective on that after making these ornate ornaments.
Throughout this post, I’ll walk you through a simple technique using modeling clay and silicone moulds to transform ordinary clear ornaments into these vintage-styled, keepsake-quality holiday baubles.
This is the first time I’ve ever made this type of ornament and tackled these after being inspired by Angelica Conrad, a fantastic crafter, DIYer and self-described “paper fanatic”. You can see more of her work on her YouTube Channel HERE.
I was genuinely blown away at the texture and visual interest that can be created with just a handful of supplies. Of course, I love just about anything with a vintage twist. I think you’ll enjoy this project.
Here’s a quick list of supplies I used for these ornaments: snowflake silicone stencil, air dry clay, Mod Podge or other liquid adhesive, assorted craft paint, clear and dark wax, gold spray paint, gold brush finish (like Rub-n-Buff), assorted paint brushes, small sponge brush.
Now, let’s start making these ornate ornaments.

First thing you’ll want to do is add a coat of primer to the clear plastic ornament which prepares the ball for painting. You can find the clear plastic baubles from just about any crafts store and they come in different sizes. This larger one is about 4-inches wide.
Lightly dab the silicone stencil with cooking spray or brush it lightly with cornstarch to help with the release of the clay. Intricate designs like this can stick in some places so coating the mold beforehand will ensure an intact design.
Gently press the clay into the mold and carefully the design from the mould.
I used a modeling clay called Delight which you can find HERE. At the time of this writing, it was $15 at Michael’s and $6 dollars at Hobby Lobby for a 4-ounce package. I ended up using 2 packages which was enough to cover eight 4-inch plastic balls and a couple of 2-inch balls. A little of this clay goes a long way, but still I suggest buying at least one more pack than you think you need.
After gently peeling the clay stamp from the mould, use the circular top of the plastic ball to punch a hole into the center of the clay pattern. Brush a liquid adhesive, like Mod Podge over the top of the plastic ball, as well as across the entire back of the molded clay piece.
Then, carefully drape the clay piece over the ornament and gently press the it onto the the plastic ball. Set aside and allow the clay to dry. Because I used a quick, air dry clay, it didn’t take long for the clay to harden on the ornament.
NOTE: Despite preparing the mould, the design will sometimes tear when released. No problem. Just gently push the area back in place as you attach it to the ball. The lightweight clay is forgiving and very malleable and the subsequent coats of paint will also help conceal any minor cracks in the design.
After ensuring the clay pattern is hardened onto the ornament, this is where the paint comes in.
Completely cover the ornament with paint color #1, allow to dry, and then, add a second coat of the same color.
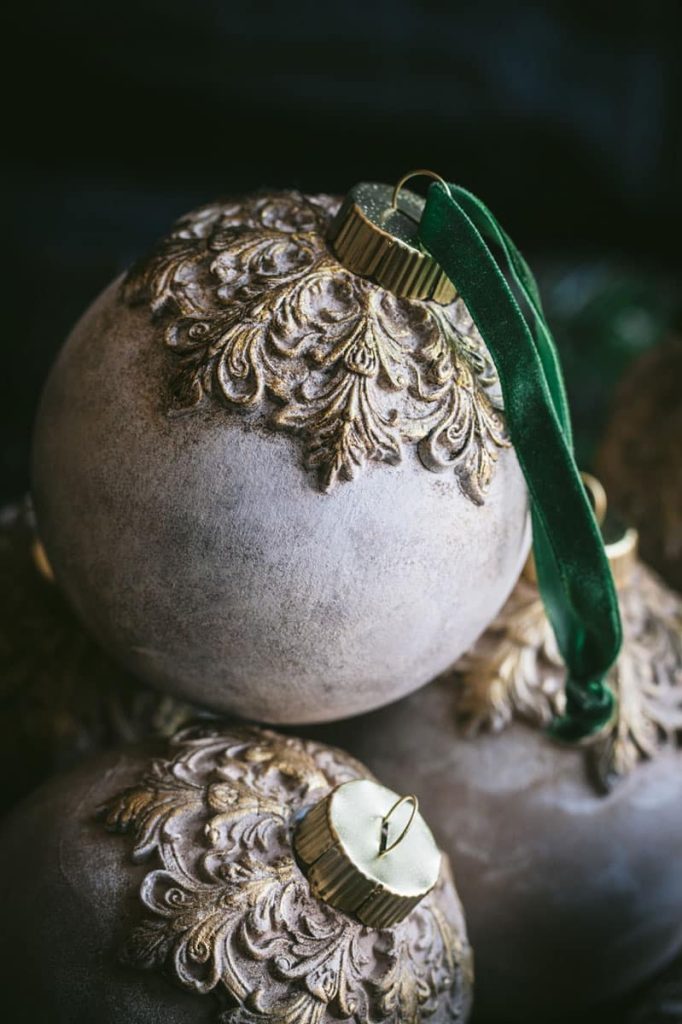
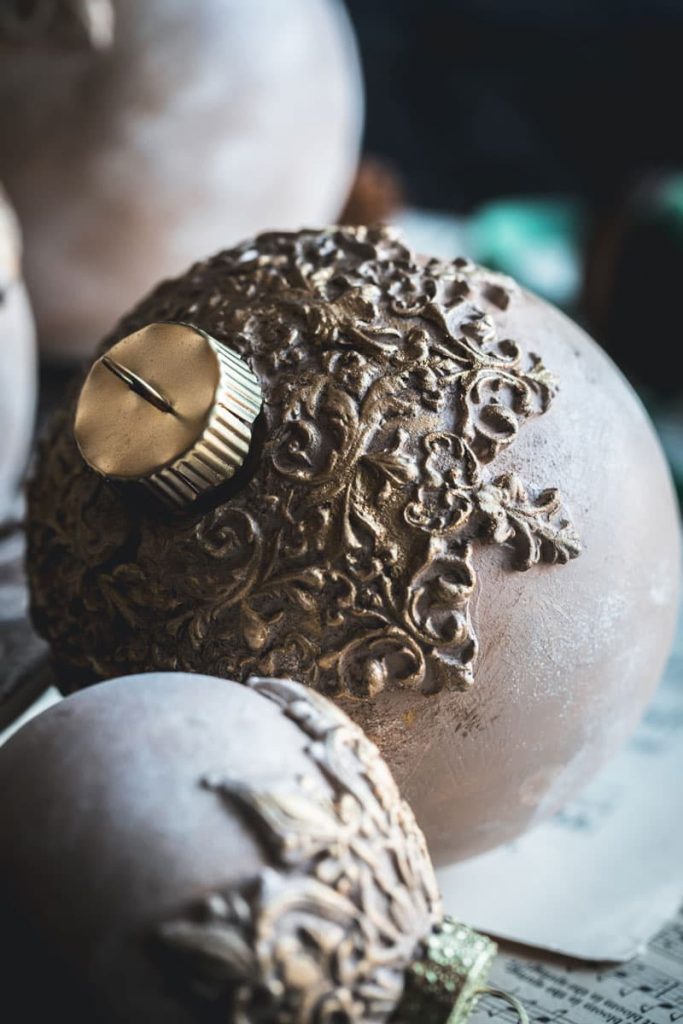
Once the first two coats are dry, use a sponge to dab on the second contrasting color. In this case, I used an ivory color to help bring out the detail in the pattern.
Gently dab the second color over the pattern, as well as the entire lower part of the ball. Using a sponge brush for the second color will help give the ball a stone-like appearance.
Set aside and allow to dry completely.
Now, for a little more highlighting.
Use a bristle brush to dab clear wax over the ornament pattern, and then, go right over the same area with a small dabbing of dark wax. Then, take a soft cloth and sporadically brush off the dark wax.
The goal here is to only leave some of the dark wax in place to create a vintage look. The clear wax underneath makes the darker wax removal easier.
Don’t forget to paint the original ornament tops and loops to match.
I used a gold leaf spray. Just spread the caps and loops out on a paper plate and spray.
Set aside to dry.
QUICK REMINDER: all of the supplies needed for this project can be found at your local Michael’s and/or Hobby Lobby, (and online of course).
Crafting in Motion
I continue to work on my videography, and I’ve included a video of this project below, for your viewing pleasure.
You can watch the video fullscreen within this post, or you can click over and watch it full screen over on YouTube. If you opt to watch this video on YouTube, please consider subscribing to my channel on that platform too.
There are tons of lovely designs available online and elsewhere. If you’re interested in the molds that I used throughout this post, I found them on Etsy and Ebay.
If you want to search online for the same silicone molds, here are the names and manufacturers below. Prices and vendors for the moulds vary greatly so, be sure to search around for the best price and availability.
Frosted Snowflake Wonders Decor Molds by Prima
Snowflake Jewels Mold by Prima
Mould Blitz Snowflakes Mold by Iron Orchid Designs
While on the subject of ornate ornaments, I have a fun experience to share.
Several years ago, I wrote a post in partnership with Balsam Hill which you can read HERE. Last year, editors representing the German edition of Elle Decoration reached out to me to see if they could use one of the images from the post as their cover shot for their December 2024 issue.
I had a heck of a time searching for the photo on multiple external hard drives, but I finally found it. That was not only a reminder to update my photo archival system, but also turned into a great opportunity to boast an international cover shoot.
Below, is a look at my original image (left) and the final magazine cover (right), in the image. Now, how cool is that?
Tips for Ornate Ornament Success
- Especially when using such intricate designs, be sure to lightly “grease” every nook and cranny to prevent the clay from sticking. Dab a small amount of cooking spray into the crevices or lightly dust with cornstarch.
- Always prime the ornament first to help the paint stick to the surface more securely.
- Give the ornament two coats of paint with the first color, following the primer coat. Allow all coats of material to dry completely before moving on to the next step.
- Use lightweight, quick air dry modeling clay instead heavier clay products. The air dry clay dries super fast and is much easier and malleable to work with.
- Always keep excess air dry clay sealed in a plastic bag to prevent it from drying out. It will dry fast if exposed to air.
Meanwhile, I’ve made plenty of Christmas ornaments over the years and featured them on this blog. You can see some of my favorite, easy-to-make holiday ornaments from previous posts via the links below.
BIRDSEED ORNAMENTS (for your feathered friends
I think these are the kind of ornaments that could be gifted to friends and family, and maybe even that neighborhood/office ornament exchange. Wouldn’t folks be surprised to learn you made this yourself?
Since the clear plastic balls come in all sizes at crafts stores, consider making an assortment of sizes. Also, a smaller, adorned ornament could be added the front to a gift, tied with a festive ribbon.
There’s little chance of them breaking easily since they’re not made of glass.
I hope you enjoyed this post and you’re inspired to try making your own ornate ornaments.
Thanks so much for popping by.
Happy holidays and I’ll see you back here next time.
-Lisa, xoxo
Lisa…..those are beautiful !!!! I am always excited to open your emails because I know there will be something
so gorgeous inside. Merry Christmas to you and your family.
Thanks so much for that, Joyce.
Hope you give this project a try too. The moulds are so beautiful to work with.
I’m going to make a few more and experiment with some different color and textured paint.
Happy holidays to you and your family this season.
xoxo