
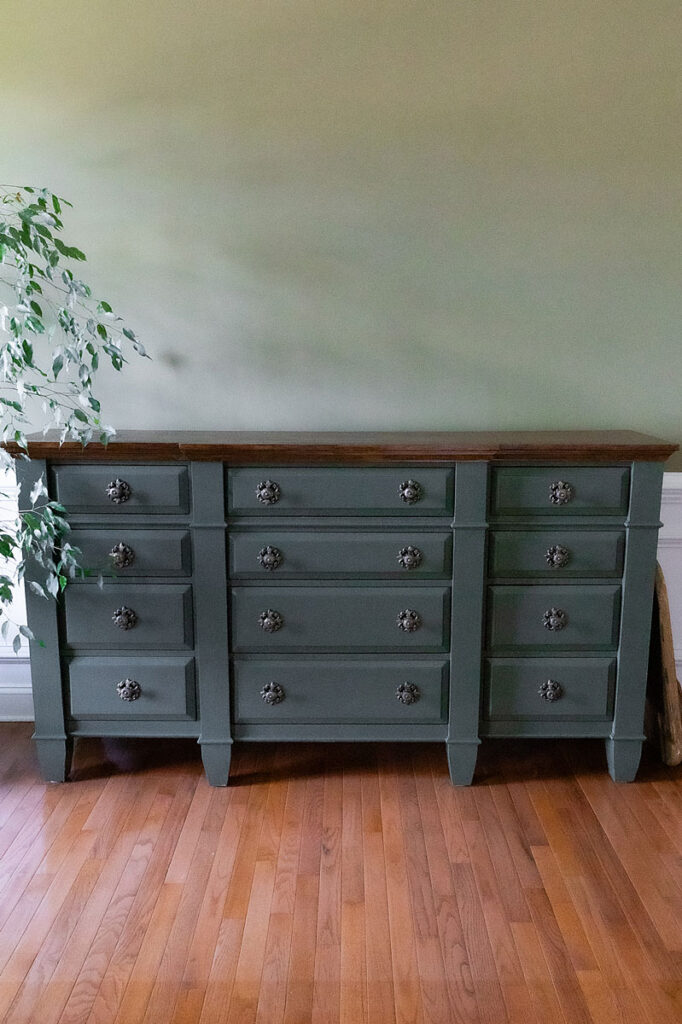
I’m super excited to share this credenza makeover with you, and not just because it’s a brand new paint color.
As thrilled as I am with this deep green shade, I’m even more geeked about the faux wood top.
The contrast between a painted base and a wood-look surface brings a stylish, custom feel that mimics the charm of real wood without the cost. And that faux wood is easier to create than you may think.
Throughout this post, I’ll walk you through every step of the way for this green and faux wood cabinet makeover.

Longtime readers of this blog may recall this cabinet facelift a while back.
This is what it looked like before this more recent transformation. You can read more about this Shabby Chic makeover project HERE.

And this is what it looked like when I first brought it home after finding it at a thrift store for $70.
As you can see from the photo above, this thrifted piece has seen its share of changes over the years.
While I really enjoyed transforming this original burgundy into the tan, rustic piece, I was more than ready to move past that distressed and overly waxed look.
I wanted something cleaner and fresher, while still maintaining some visual interest.
The first thing I had to do was remove all that heavy, dark wax. Furniture wax can be removed fairly easily using mineral spirits.
It’s definitely a little time consuming, but it was so important to stick with it and get all of the wax removed.
Honestly, I didn’t even realize how much dark wax I originally applied to this piece, but once I started removing it, you can see how much of a contrast there is between the waxed area and the un-waxed surface in the two photos above.
I lightly sanded with with a fine grit sanding block, wiped it down with tack cloth and also cleaned it with a denatured alcohol and water solution to make sure all dirt and oils were removed, before adding a layer of standard paint primer.
Once completely dry, I added the first of two layers of the Black Bamboo paint, using a roller brush for the wider areas of the cabinet and a small paint brush for more narrow nooks and crannies.
The roller brush helps to ensure a smooth application with no visible brush strokes.
Getting the paint evenly applied to these chunky legs was a little difficult at first because the drop cloth kept getting in the way.
Using wood blocks to lift the cabinet up off the floor was an easy solution to get the paint applied evenly all the way around each leg.
I picked up a single 8-foot ($4) piece of lumber from my local hardware store, and had a staffer cut it down into 6-inch blocks for me to use as lifts.
I ended up with over 20 blocks, far more than I needed, but I’m sure I’ll find a use for the extra blocks for some other project down the road.
Dapper Drawers
You know, you never quite know exactly how a paint color will work. But as soon as I painted these drawers, I was sure I made the right decision.
This Black Bamboo obviously has a lot of black in it, but it also has a faint bluish undertone.
It’s clearly still green, but it’s a green in a deeply rich, lush shade.
Now, let’s fancy-up that dark hardware.
I used a small makeup brush to dab Rub-n-Buff gold coloring onto the iron hardware pieces to give it a little bit of gold pop.
If you add too much of this color. It’s easy to wipe the unwanted color off, no sanding is needed. You can remove a little or a lot of gold with one of those Mr Clean Magic Erasers.
Here’s a before and after on the knobs. Big difference, right?
You can also apply Rub-n-Buff with a soft cloth or even your fingers, if you like. It’s great for anything that needs just a wee bit of metallic finish and it’s available in a 1/2 dozen colors.
I used European Gold for these knobs and it created just enough of that Old World gold highlighting that I was going for.
Finally, I found this pretty peel and stick wallpaper to add to the inside of the drawers.
Simply measure the width and length of the interior drawers and cut the paper down accordingly. Since it’s peel and stick, I can easily change it if I spot a paper I like better down the road.
This is entirely optional but I do like the extra pop of contrast that it adds to the interior of the drawers.
The Faux Wood Process
Time to tackle the top of the cabinet. I’ll admit, this was the most exciting part of this project because I’ve never done this before.
I knew I wanted a wood-like finish and after a little online research, I found a product called Retique It which allows you to create a faux wood on just about any surface.
I did a test run first using an old wood board I had in the garage. That little bit of practice gave me a little more confidence about the technique before actually trying it on the cabinet.
This process requires that a wood primer that came with the kit. The primer has actual wood fibers in it and is designed to help prep the surface for the faux wood treatment and I gave it three coats.
After the wood primer dried,
I have more about this alcohol/water solution in my Tools and Supplies list further down in this post.
Creating the faux wood is a really interesting process and much easier than I thought it would be.
I started out by adding a layer of “wood and primer”, which came with the kit and is applied just like regular paint. This primer has real wood fibers in it and that helps give it a slight wood texture at its base.
Allow it to dry completely.
Next step is to apply a stain color (also from the kit) in broad strokes and almost immediately use the rubber stamp to scrape the just-stained area. The wood grain impression is carved into the stamp and creates that distinct wood grain look
Once that’s dry, the final stain is applied in the desired color. Allow the stain to dry completely before and between additional coats.
Ultimately, the final color is built up over more and more layers. Be sure to wait for each stain layer is completely dry before adding the next coat.
VOILA! Pretty amazing faux wood technique, right?
I plan to add a final clear, protective topcoat soon, but I’m going to wait a few more weeks before doing that to make sure the top is completely dried and fully cured.
NOTE: I bought an entire kit from the Restique-It website. However, individual products can also be purchase via Amazon, and you can also use your own final stain color. Be sure to check the company website to watch the video and to get a list of recommended substitute stains.
This post is not sponsored by Restique-It or any other brand. There are many other faux wood products and techniques on the market, but this one worked for me, and I’m happy to share that with you.
Transformation in Motion
Tools and Supplies Used
Prepping furniture for painting can be a drag and is probably the least favorite thing about taking on a project like this. No matter how boring the prep work, stick with doing it correctly. It will have a direct impact on the success outcome of the project. No skimping on this oh-so important step.
You may already own some of the supplies below and there may be things on my list that you don’t even need for your project, but here’s my full list anyway.
Primer Stain Blocker Prepares the surface for painting by creating a smooth, even base for the top coat to adhere to. A primer also helps to block old paint colors from bleeding through the new coat.
Sandpaper Blocks 120/400 Grit Helps to smooth the surface (to be painted or already painted), to help add a bit of grip for subsequent painting to adhere to.
Tack cloth This is used to remove dust, debris and lint from surfaces before painting, staining or finishing. They’re good to use especially after sanding because they’re lightly sticky and pick up that teeny-tiny dust that you may have missed wiping off.
Drop Cloth You can use an old sheet, but I like canvas drop cloths because they’re more durable and help stop paint and droplets of all kinds from seeping through to the surface underneath. Be sure whatever protective cloth is wide enough to fully extend beyond the piece to be painted.
Lint-free shop rags I used rags when removing the old wax from the cabinet. Also, it’s just good to have old rags (or chopped up old white undershirts) on hand, to use for wiping down surfaces, paint brushes, etc.
Odorless Mineral Spirits This is what I used to help break down and remove the old wax from the original cabinet.
Denatured Alcohol This mix will help break down and neutralize grease and dirt. This product was recommended by the “Retique It” website to help prepare the surface for the faux wood effect. I mixed equal parts water with the denatured alcohol in a spray bottle (as recommended), and sprayed onto the surface to clean before wiping down.
NOTE: I was initially concerned about using the denatured alcohol after applying the wax-removing mineral spirits, but after a little research found that it’s NOT harmful to use the denatured alcohol after using mineral spirits. Still, always double check the safety of using various chemicals back to back.
Behr Paint Cabinet Door and Trim Enamel I used the color called Black Bamboo. I only needed a 1-quart can to cover all the drawers and entire cabinet with multiple coats. Foam rollers help the paint go on smoothly.
High Density Foam Mini Foam Rollers Sometimes broad strokes with a brush will leave brush marks. You may still need a small, regular brush for tight corners.
Rub ‘N Buff I used a small makeup brush to apply this gold coloring to the iron hardware on the cabinet. The makeup brush allows you to dab just the right amount onto the knobs. If you make a mistake and add too much, you can easily rub it off with a Mr. Clean Magic Eraser.
Restique It Wood Finish Kit I found this product while researching how to create a faux wood surface. This is a fascinating technique that allows you to use a rubber stamp to create a wood grain pattern in a specially formulated stain. Once it dries, you use another water-based stain to darken the pattern you just made. The website has several helpful videos of the process, as well as multiple wood colors to choose from.
Peel and Stick Wallpaper Easy to measure, cut and install, this paper just gives the inside of the drawers a little extra pop.
Inspiring Hues
When I first told my twin sister, Paula about my plans to paint the cabinet green, with a dark faux wood top, she said, “that’s just like the colors of that mixer you just bought”. That hadn’t occurred to me, but she’s right. I guess I really do love this color combo.
Meanwhile, I was inspired by this oversize botanical print from Magnolia. It’s even prettier in person, and has some of the same Black Bamboo coloring.
It came with a wood slat at the top and bottom, that I may stain to match the cabinet top. If I don’t like the stain, I may just remove the wood from the print altogether and build my own custom frame.
Meanwhile, I hope you’re inspired by this Green and Faux Wood Credenza Makeover.
I’m really geeked about the faux wood process, and I’m already looking around my house for more old furniture that could benefit from the same faux wood treatment.
Thanks for popping by for a visit.
See you back here next time.
xoxo
Quite a project! Great outcome as usual. All the best, Nana Banana
Thanks, Mum
xoxo
Great job! I always enjoy your posts. You have a lovely home to be proud of and it shows! Congratulations on your new project!
Thanks so much, Rita.
Glad you enjoyed the project.
I’m already looking around to see what other surface needs a faux wood treatment-lol.
Have a great week.
xoxo
Just beautiful Lisa. Love the furniture makeover! It’s a great way to take a family heirloom piece and make it over to something that you absolutely love. It’s a fun project 😀