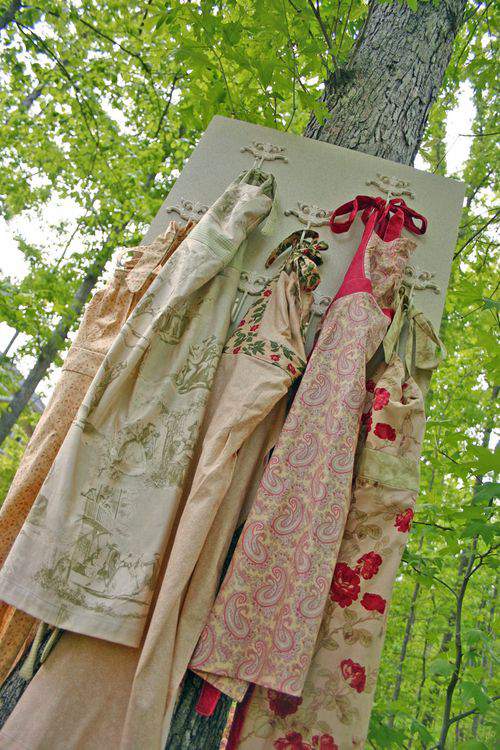
Pretty aprons don't grow on trees, but it sure would be nice if they did, wouldn't it?
I've had this collection of homemade aprons for a while but until recently, they were unceremoniously relegated to the back of a dresser drawer.
I decided to make this holder so the aprons would be more easily accessible when I need a cover-up for a paint project or some other potentially messy craft endeavor.
Throughout this post, I'll walk you through the simple steps involved in making this easy apron rack.

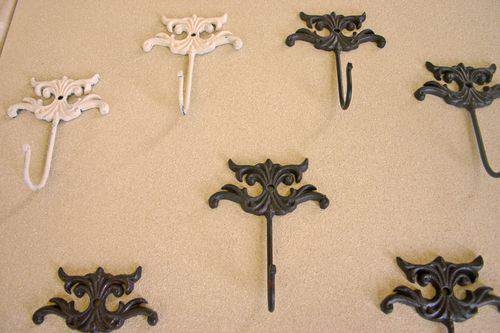
Start the project with pretty hardware. I recently found these wonderful wrought-iron hooks for $2 dollars each.
With a deal like that, I grabbed a handful even before I knew exactly what I was going to do with them.
While I love the rustic, look of these hooks, once I settled on a project I realized this dark/heavy color wouldn't quite do. My plan called for a lighter approach.
Of course, that's an easy enough fix.
Enter a dab of wheat-colored latex paint into the picture and the hooks are quickly transformed.
Apply the paint in a stippling motion as if stenciling the wrought-iron. By stippling the paint, little specks of the original dark color will still peek through the new color.
I think the addition of the wheat color definitely gives these hooks a softer, more vintage appearance. I like it.
You only need a few other supplies for this project including, primer, a wood board, paint as well as picture-hanging hardware.
Because my hooks are wrought-iron I wanted the backboard to have a similar look so I used a textured paint.
This spray paint resembles stone when applied to a surface.
Before applying the textured paint, add a coat of primer to the project board surface. This will help the paint adhere evenly to the wood board.
If you don't already own a drop cloth, this is a good item to have on hand. You can pick one up at any paint or hardware store.
I use this drop-cloth all the time for various indoor paint projects and it provides perfect floor protection and eliminates the need to spread newspaper all over the place.
After the primer dries, apply the desired paint. This project required several layers of the textured spray, but it was quick drying.
When using paint sprays, remember to always use them in a well-ventilated space, or better still outdoors if you can.
Here's a closer look at how the stone, textured paint looks.
I can think of lots of great ways to use the effect, including old flower pots or outdoor furniture just to name a few possibilities.
Once the board has dried, arrange the hardware to get a sense for the desired layout. Try several different arrangements, keeping in mind how the board will be used.
Because this is an apron rack, I staggered the hooks in a way that would keep the pretty hooks visible even when the hooks are in use.
Finish painting the hardware and use wood screws to attach the hooks to the board.
Note: When buying the screws, make sure they are long enough to secure the hook into the board, but short enough not to punch through the back of the board when screwed in place.
Once the screws are in place, dab each one with the paint so they blend in with the painted hook.

Applying picture-hanging hardware is pretty easy too.
Just screw the hooks in place on both ends and add the wire. Twist each wire end several times to secure. Attach the hardware about mid-way on the back of the board to ensure it's invisible once it's hung in place.

When aprons (and other crafts supplies for that matter) are in plain view, I think they're more likely to get used. Of course, that's precisely the point.
For now, this new apron rack looks fine right next to my homemade thread board which is another easy-to-make storage solution for assorted threads.
This apron rack is an all-in-a-day DIY project that's also pretty fun to put together.
There's no better time to get those craft aprons out of that old drawer or box and just hang 'em high. ♥


I remember some of these aprons from an earlier post; as lovely now as they were then. I like your idea of hanging them. I, too, have been thinking our aprons don’t need to be folded and hidden away in a drawer or cabinet, and now I have a great idea as to how to hang and display them. Thanks, Lisa!
I have my collection of aprons hanging on a shakerstyle peg rack in my kitchen. LOVE your pretty rack ♥
This is a great idea for display Lisa. Thanks for sharing such detailed steps in the photos. Love the picture with the aprons hanging next to the colorful threads!
Lisa, YOU are SO AWESOME!! I love following your blogs!! Your projects are always SO AMAZING!! Thank you for sharing!!
What a gorgeously simple project Lisa! I love that stone paint and your hooks are wonderful. Your aprons look so charming next to your thread – and I love the painting at the top of the thread rack!
tes tabliers et leur support sont vraiment très jolis
à bientôt
ton amie française
cricri
I really need to make one of these hangers. It is beautiful and functional. I’d put it in my kitchen. My friend has an apron collection. This would be great for her.
Love this project! And your aprons are beautiful!. I’m off to check out your homemade thread board!
I simply love your work!I know I can come to your blog and find something I would like to make myself, even if I never do!.
Those aprons are too pretty to be used when painting! I love the idea of hanging them up to be seen & The rack is a great idea! As always, I am inspired by your blog.
Hugs,
Debra
Just discovered your wonderful blog today! Those hooks are great! I’ve been thinking a lot about hooks lately, as I need a place to hang my many, many bags. Maybe there will be room for an apron or two as well…
Oh Lisa! This is a wonderful idea and I have a perfect place for this! It really is like a piece of art work and I really hate my aprons being in the drawer since they are so pretty. Thanks for the idea!
This is a great idea for display Lisa!
Thank you for sharing with us.
Lovely photos.
Lisa
Your apron display is so pretty!Thank you for sharing.
rosie
wow! excellent ideas! looks expensive already. yay! love it! priceless! hahah
thanks!
What a gorgeous display! and your thread variety is just eye candy!
Love the toile apron!
OH MY GOD! this is just helpful..I wonder if I can make some for my room.
This is great design. I love the finish.
I always wanted to know about this, excellent.
I love this idea, it looks so simple and classy at the same time, it is just amazing! Thank you so so much for this lovely idea, I’ll definitely try to apply it whenever I have enough time!
I’ve never thought about this wonderful idea …thank you very much…your site is a boon for me
Dear Lord!
They look awesome! And the process is so simple! I would never suspect a thing!
Thank you so much for this tutorial!
what a great DIY work there you have Lisa…I greatly appreciate your apron rack! and thank you so much for the detailed follow-this-step procedure.
-david the great-