Sometimes it’s the little things that can contribute to pretty food photography.
For the last few years, I’ve been a little obsessed with making good looking food and taking lots and lots of pictures of it.
It’s how I relax, it’s how I have fun and it’s how I grow my photography skills.
Throughout this post, I thought I’d share a little about my approach to taking pictures of food.
There are so many little things you can do to help a shot go from blah to beautiful.
When I look back on some of my earlier pictures on this blog, I can’t help but cringe at a few of them.
As much as I can see how much my skills have improved over the years, there’s so much more room to learn and grow.
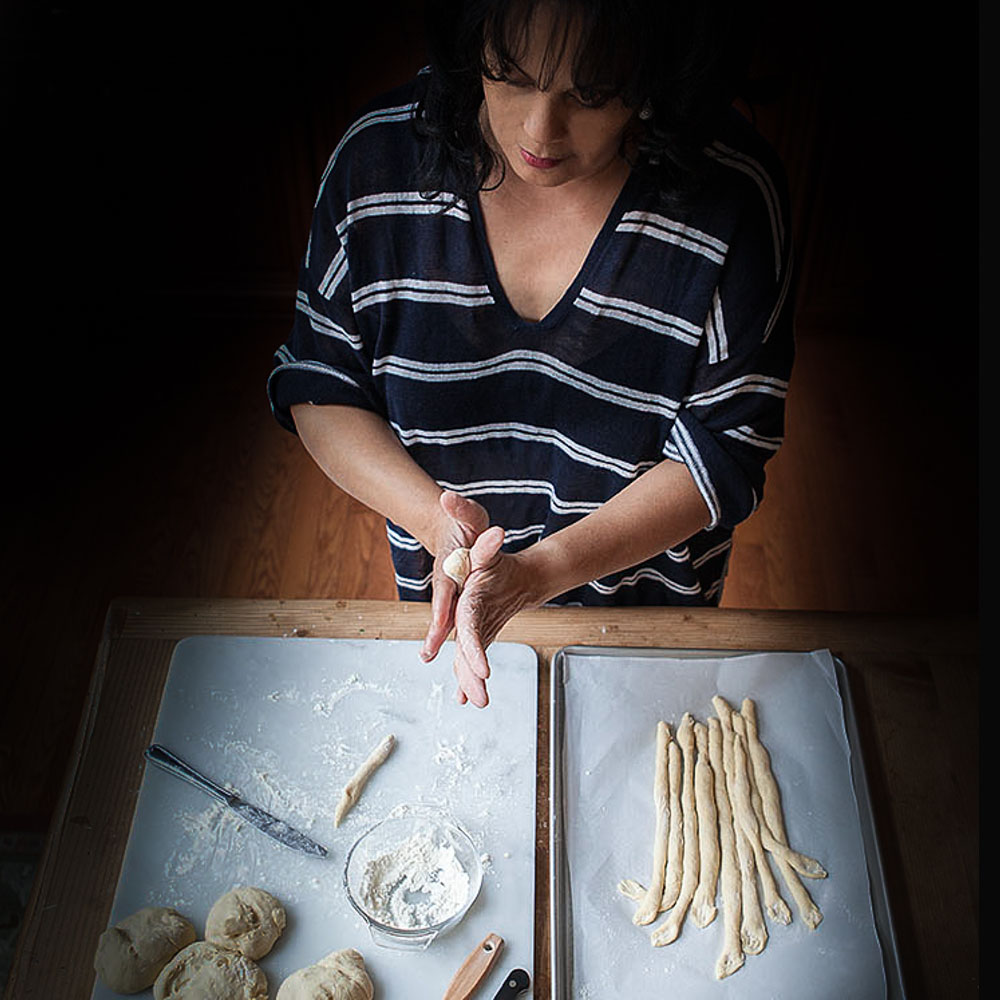
1. Find time to practice.

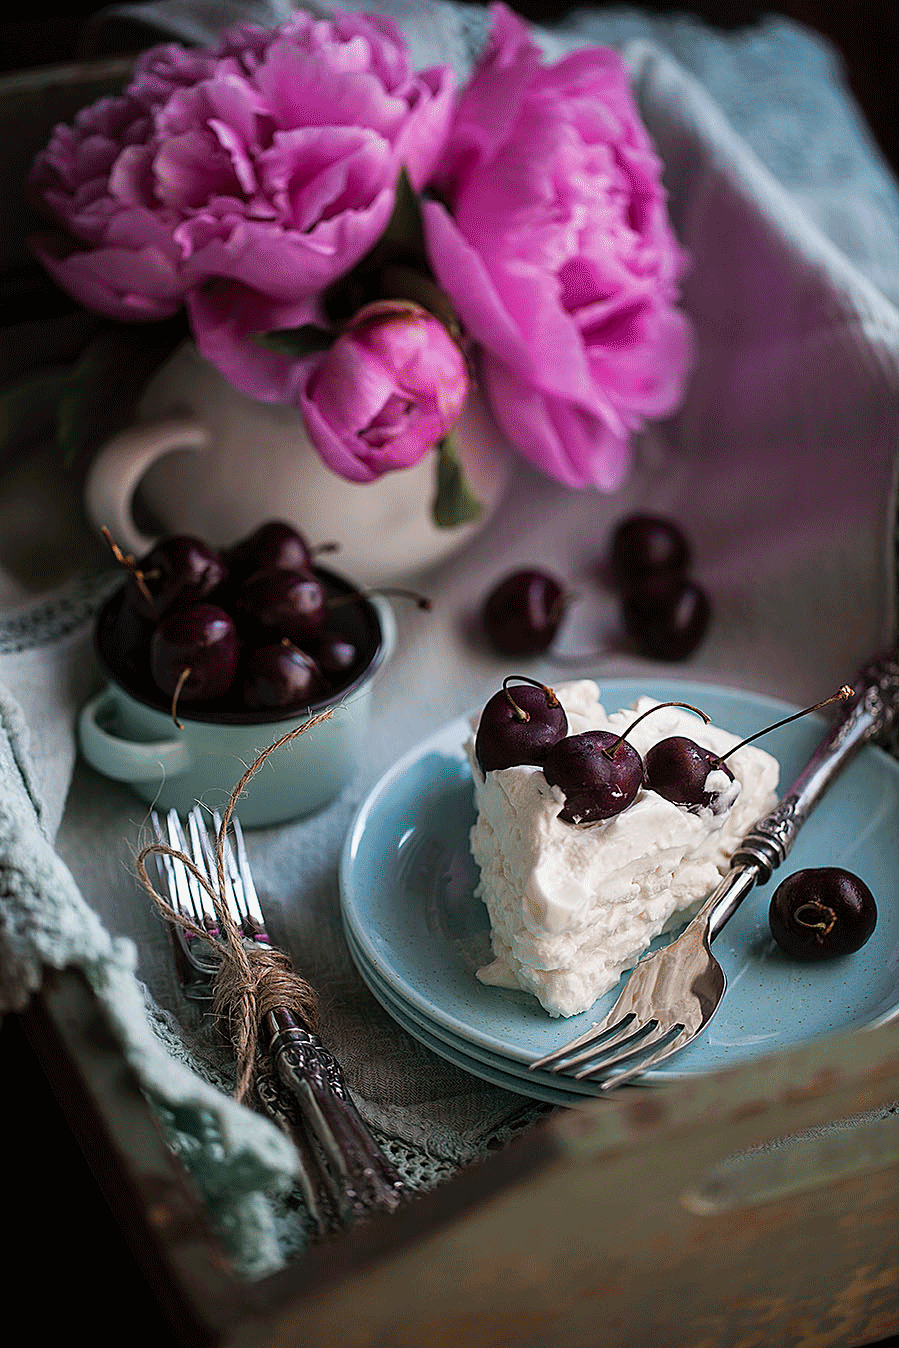
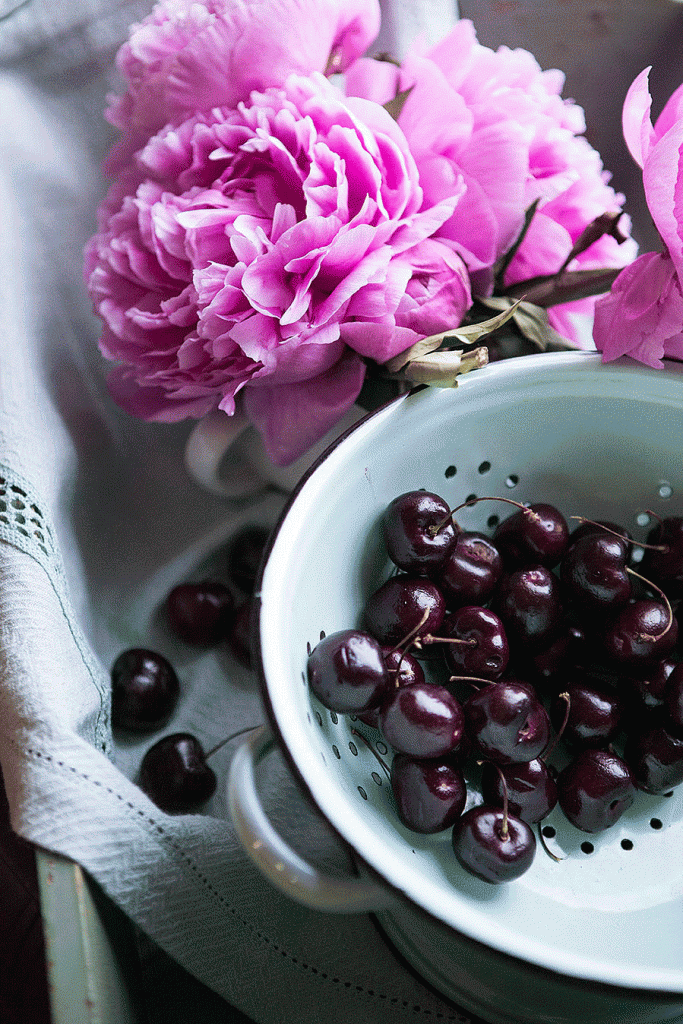
When I was styling the shots for this Pavlova, I started out with these pretty peonies and actually built the arrangement around these dainty flowers.
The flowers were a gift and to be honest, I styled these photos right before I thought the peonies would die because I wanted to put the flowers to maximum use.
This turned out to be an easy way for me to cram in some food styling and photography practice (and my family got an unexpected dessert in the process).
I look for ways to practice and play around with styling and when I’m lucky, the practice photos can be turned into a blog post.
2.Try not to let good flowers go to waste.
When it comes to food photography, I think one of the most important factors are props.
I prefer natural and vintage looking props so that the food looks real and accessible with a hint of “old-fashioned” thrown in.
Woods, textures, crisp linens are just a few of the items that I love incorporating into my food styling.
I’m always on the lookout for interesting pieces that I might be able to use to give my photos a little extra character.
3. Keep your eyes peeled for potential props.
You know how some ladies get a kick out of shopping for a new pair of shoes or a pretty blouse?
Well, a new prop, linen napkin set or new wood cutting board or backdrop is what really puts a smile on your face.
Whenever I go shopping, I find myself looking at everything through the “would this make a good prop” lens.
Also, one of the best set of props I’ve ever come across are a set of old baking trays that I found in my mother’s basement. They’re dark and burned looking and they make wonderful backdrops.
4. Scour your home (and family members’ basements) for treasures.
Late last year, I wrapped up a month-long Lightroom photo editing course at my local fine arts center and it was a real eye opener.
There are so many tools in that program that I didn’t even know about that help enhance and clarify photos.
I’m eager to put some of the new things I’ve learned to good use.
I’ve written about my experimentation with Lightroom and Photoshop and you can read that previous post HERE.
5. Consider using photo-editing software and tools to help your photos pop.
I’m a big fan of using at least one unexpected element.
For example, this jute tied around the forks make the forks look far more interesting (to me) than they would look just stacked together.
Technically, I’m not sure the jute makes “practical” sense but it does add visual interest and that’s what I was attempting to add to the styling.
This would be especially cute if these jute-tied forks were packed inside a picnic basket. Keep that in mind for this summer.
6. Don’t be afraid to add a dash of unexpected delight.
Almost all of my pictures of food are snapped in my dining room where I get great natural light that pours in through the windows.
In fact, sometimes the natural light is so intense, I have to diffuse it.
I use a circular diffuser to soften the light but if you don’t have one, you can also use a sheer white curtain to help temper the harsh rays.
Find the natural light in your home and use it.
7. Make note of the best light in your home and the time of day and plan your picture-taking accordingly.
It may also help to think about trying to tell a story with your food photos.
Think about what you’re trying to say or convey with the images you’re creating.
That will help you decide what elements to add to the shot.
Even though most of these pictures were taken in my dining room, I wanted the food in the photo to look like it was being elegantly served.
I wanted it to have a kind of breakfast in bed look… but with a dessert.
Does it work? What kind of story or mood do the pictures in this post suggest or evoke to you?
8. Try to tell a story.
- 4 egg whites room temperature
- 1 cup sugar
- 2 teaspoons of corn starch
- 1 teaspoon vanilla
- 1 teaspoon of white wine vinegar
- FOR WHIPPED CREAM FILLING
- 1 cup heavy whipping cream
- 1/2-1 cup of confectioner’s sugar add confectioner’s sugar to desired sweetness
- 1 teaspoon vanilla
- Cherries or favorite assorted fresh fruit
- Preheat oven to 180-degrees.
- Whip the egg whites in an electric mixer using the whisk attachment. Beat on high speed for about 3 minutes or until soft white peaks begin to form. Add the sugar and beat for another minute.
- Remove from stand mixer.
- Add the cornstarch, vanilla and white wine vinegar.
- Fold these last ingredients into the mix.
- Use a small bowl to trace circles onto parchment paper.
- Turn paper over so pencil marks are on the bottom.
- Spoon the egg white mixture onto the parchment paper using the circles as guides to form the mixture into circular shapes.
- Place circles on a baking tray and bake for 90 minutes.
- To make the whipped cream filling: Chill stand mixing bowl for at least one hour. Whisk whipping cream in mixer. Slowly add sugar and vanilla. Add smallest measurement of sugar and taste, add more sugar for a sweeter cream.
- Whip cream until fluffy.
- Spread whipped cream filling on Pavlova wafer, top with second wafer, spread more whipped cream, top with final wafer and add whipped cream.
- Top with cherries (or favorite assorted fresh fruit).
- Best served chilled and on the day you make it.
Thanks for stopping by.
See you back here next time. ♥
Lisa, your blog was very informative and interesting. I simple love your tips and ideas my dear sister/friend!!😘😘😘
Skeee-Wheeet! Thanks so much Linda.
So glad you popped over for a look around.
Hope you try out some of these delicious recipes I have around here.
Hi to Brenda from me. Still two of my all-time favorite twins.
Stop by anytime, sweet soror.
First of all, pavlova is my daughter’s favorites dessert! And I am learning so much from all your great guidance on food photography. I played around this weekend and now just need to edit in lightroom. Thanks Lisa…SO.MUCH.TO.LEARN!
Don’t you just want to make some Pavlova now-lol.
I can’t wait to hear (and see) more of your progress, Lynn.
Glad to know you’re practicing and feeling good about your efforts.
Email me after you’ve tried that TAT feature we talked about. I’d love to know your thoughts on it.
Thanks for popping over and I hope you have a wonderful day.
These are gorgeous shots! Would you want to do a post on the interesting things you learned at your Lightshop vs. Photoshop class? 🙂 I have a Nikon P80 (it has a 18x magnification) …… all those great cameras you expert photographers use, cost twice a mortgage payment…… 🙂 I’d like to be able to somewhat replicate digitally what I see. I’m not sure if I ever can though. I really liked your styling tips. And I completely felt the vibe you were going for . (And I love peonies!) Be well!
Thanks so much, Dana.
I’m learning all the time and I’m happy to share a bit here and there.
FYI-I also have a Photography section (with other tips)under the Lifestyle/Seasonal drop down in my navigation bar.
Glad you got my vibe too-lol.
Happy day to you.
So beautiful! The story? Quite decadent I’d think…imagination take flight!
I really appreciate that, Teddee.
Hope you have a wonderful day.
Thanks for popping by.
Lisa, I’m so glad to read your post today. Your photos are just beautiful and so inspiring. Thank you for sharing your incredible gift.
Happy to inspire you, Laura.
Thanks so much for your sweet words.
Hi, Lisa,
Love your photo styling tips and getting to see your diffuser. Pinned to my Pinterest board: Photo Styling for future use and repeated visits.
Judith
Judith, hope all is well in your neck of the woods.
Thanks so much and for pinning too.
Happy day to you.
Lisa, I LOVE your photos! Gorgeous. Every time I go to your blog it refreshes me sooo much and gets me smiling in the morning! Thank you!!! 🙂
Jen, your words put a smile on MY face.
That makes me feel great to know my work get your day started on a pleasant note.
Thanks so much.
Great tips, Lisa! Your photos are absolutely beautiful so much so that I had to go back to look at your dessert. Right now I’m involved with learning photography in little everyday snippets. In turn, I’m learning the functions of my camera. Then, it will be Lightroom and Photoshop. It’s a good thing I don’t live close to you — I’d be *ahem* dropping in just to see what you’re up to. You’ve got me started looking for props. Have a wonderful day. Hugs!!
Marisa, I’ve been following your progress on Instagram.
Stay the course, girl. I’m still learning the functions on my camera.
Wouldn’t that be fun if we lived near each other. I think we would be cooking and snapping pictures together every day-lol.
Thanks for your encouragement.
Your photography is truly amazing Lisa! Have you ever thought about doing a workshop/classes? I’d be there!
Thanks so much, Shirley.
I’m going to keep your suggestion in mind. Stay tuned-lol.
Happy day to you.
Your photos are always so beautiful and you do such a great job with styling the photos as well. Just lovely!
Thanks so much, Megan. I appreciate that you popped over and I’m glad you’re finding things that truly interest you.
Do let me know when you try a project or recipe from here. I’d love to know how it turns out for you.
Hope you have a wonderful week.
Lisa, what an inspiration you are. I am a new blogger with few posts under my belt. Your styling suggestions are wonderful and I will keep coming back for More!
Lisa, you have shared some great tips. Love the moods you create in your food images. Thanks so much for the inspiration.
Gorgeous! Would love to photograph like this someday. Are you self taught? What was your biggest ‘help’ in learning?
Hi Julie, thanks so much. Yes, I am self-taught.
Practice has been my biggest help. I take pictures almost daily and play around with styling and use of props.
I also use Lightroom to edit my photos for sharpness and color correction.
Lately, I’ve also been experimenting with Lightroom to adjust lighting to create dark mood and atmosphere.
I have a “photography” section in my navigation bar (it’s under Lifestyle), that you may find helpful too.
Good luck and feel free to drop me an email anytime if you have an specific questions.
Have a lovely week.