
M
y habit on this blog has typically been to share only the projects that I have completely finished. Well, I'm departing a bit from that trend today with a look at a project I'm actually still working on.
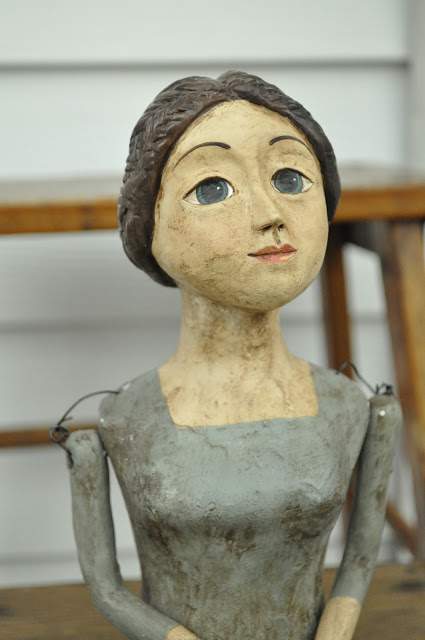
The three figures in the photo below are part of my latest unfinished/ongoing project on how to make Santos dolls. I'm pretty excited about how they're turning out too.

Even if you've never heard of Santos dolls (Santos is Spanish for Saint), I suspect you've probably seen them before with their sweet, serene facial expressions and soft, gentle looking gestures.
These dolls have a long and deep religious history which dates back centuries when they were first used as part of in-home alters in small, rural villages where the faithful had little or no access to priests.
The Internet is filled with lovely examples of these exquisite dolls many of which wear jewels, crowns and/or wings.
Here are a few Internet photos that caught my eye. Gorgeous aren't they?

Source for above images: Internet
Meanwhile, the on-line Santos doll course I'm taking is instructed by fellow blogger Jennifer Rizzo.
She's an amazing instructor (with a very lovely blog) who makes the dollmaking process fun and easy to understand.
This is one of the many dolls that Jen has made.
 Above photo: courtesy Jennifer Rizzo
Jen's Santos Cage Doll course (offered through Jeanne Oliver's Creative Network) features a series of videos where Jen demonstrates everything about making the Santos dolls from how to make the body, sculpting the face and other features, making the arms, bases, assembly and so much more including tips, tools and special techniques.
Her course only costs $19 dollars and all the course info and videos will be available for one year from date of purchase. So there's plenty of time to perfect the dollmaking steps.
You can read more about Jen's Santos Cage Doll course here.

Above graphic courtesy: Jennifer Rizzo
I'm not going to give away any trade secrets from Jen's course but I do want to share a few pictures of a few of the stages of my dolls so far.
They started out as nothing more than a paper mache egg, dressform and wood stick.

It doesn't take long before these simple elements are transformed into something that is somewhat recognizable and before you know it the doll starts to appear right before you eyes.

Paper clay is used to give the paper mache elements shape, substance and definition.
I'll admit, it does take a little practice to get the outline and shape just right but that's also part of the fun of the process.
Don't forget, I have a whole year of access to Jen's video to help me figure it out to perfection.

See, it's taking shape already.
Pretty cool, isn't it?

Of course, why make just one doll when you can work on a trio at once?
Oh, I can't wait to finish these.

As you can see my lovely ladies have a long way to go before they're done.
When all is said and done, they'll have a full body, arms and a nice face (I'm struggling with shaping the lips but Jen assures me I'll get them just right in no time).
I'm also working on a few handcrafted clothing items and headwear to help make this trio of ladies really shine.

I hope you check out Jen's Santos doll course, I think you'll enjoy it as much as I do.
Meanwhile, I'll definitely share my finished dolls here when I'm done.
So, that's a look a WHAT I'M WORKING ON.
What are you working on? ♥
COMING UP NEXT MONDAY

Thanks to hot and humid Summer temps we're all looking for ways to keep cool and also keep our hair looking sane at the same time, right?
Well, box braids may just be the answer.
My daughter has been begging for braids for a long time and I finally relented.
Coming up next Monday (7/8), I'll have more on these popular braids and also give you a closer look at the amazing installation process.
Hope you pop by here again next week for a look at BOX BRAIDS.
See you then.

I have seen Santos dolls before, but never a course on making them. That is fantastic! What a fun project!
I am working on putting in a formal garden in my front yard that will include several thousand flowers (I will plant 900 bulbs in the fall) as well as several edible plants for an edible landscape that also allows me to have plenty of flowers for the garden and the house. I am doing all white flowers.
The challenging part is that it was 118º today. It was very similar last week and will be that hot this week, which is not kind for transplanting. However, my basil and zinnia seeds are up and doing well, and a few parsley and vinca seeds came up, too!
wow! can’t wait to see the finished dolls!
I’m looking forward to seeing your completed Santos Doll.
Hi Lisa,
just to say that i love your blog,
but the word “santos”is also portuguese
Love from Portugal
Ana
I am just so captivated by these Santos dolls and continue to search for some. Looks like you are off to a great start!!!!!! Keep us posted…..🤗
Thanks so much, Lori-Lynn. Santos dolls are pretty amazing. I’ve seen some beautiful ones online too. I still have to finish mine with some pretty clothes and adornments.
Happy day to you.
Love your work… I have a question… when making the dolls… where did you find the small dress form???? I can’t find any like yours!!!!
Thanks so much, Candace.
I think I found these forms at either Hobby Lobby or Michaels.
They’re were cut off at the head and only had a torso.
The head was a wooden egg added to the base.
This was several years ago.
You may also be able to find these online.
Good luck and happy holidays.
Hi, I have been looking everywere for the cardboard torsos and heads for the santo dolls, any idea were I can get them please.
Hi Ann,
I’m pretty sure I picked these up at Hobby Lobby many years ago.
Hopefully, they still sell them.
Good luck and have a lovely day.
xoxo