A re you one of those people who has a box of baby clothes and momentos tucked away in a box, just too precious to toss or give away?
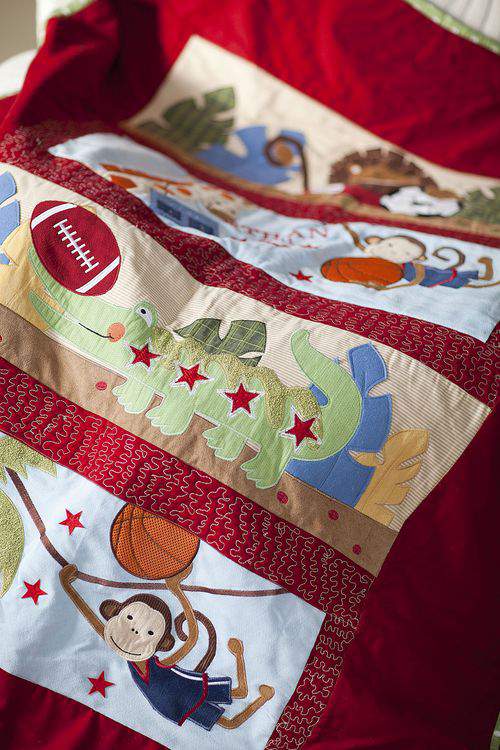
Well, this baby quilt is an example of how you can turn a long-held baby item into a new momento that can be used for years to come.
Yes, you can make this crib bumper quilt.
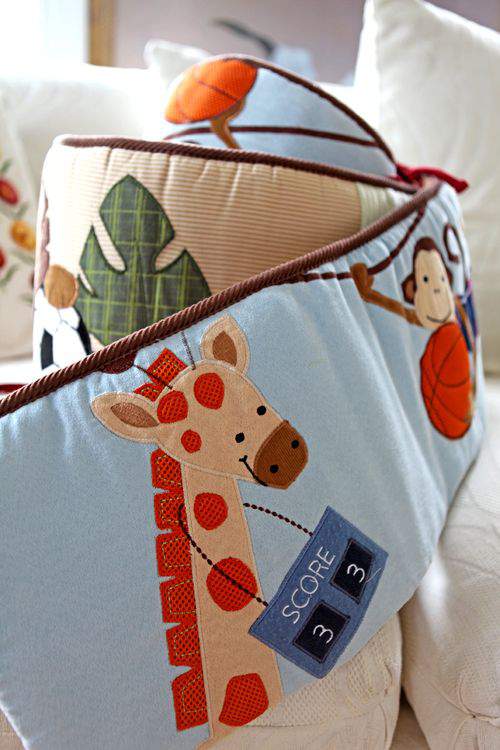
The adorable panels that make up the quilt in the above photo started out as adorable panels in the baby bumper in the photo below.
A longtime friend received the crib bumper as a gift and after her son outgrew it she asked if I could transform it into something more useful because it held such sentimental value to her.
Since I rarely shy away from a crafting challenge, I agreed to take a look at it.
I put my seam-ripper to work and took the entire thing apart and ironed all the panels flat.
I initially thought about using the panels to make a soft book but the panels turned out to be far too long and it was too difficult to square them up and preserve the cute animal images at the same time.
OK, on to the next idea.
That’s when the quilt idea came to mind.
First, I used my embroidery machine to personalize one of the panels with name of my friend’s child and the year the bumper was given to him.
If you don’t have an embroidery machine, you could hand embroider this step if you like.
Several of the panels were plain with no images so I decided to only use the four panels that had pictures on them.
I cut several strips of red fabric for sashing, which is used to connect all the panels.
Sew the sashing strips along the top, bottom and sides of each panel.
You could mix up the colors of sashing used during this step but if you stick to the same color, the panels will appear to float in the middle of the finished project.
Once all the panels are attached, add another wider strip (8-inches in this case) all the way around to create the top of the quilt.
You’ll need a cotton middle layer (referred to as batting) and backing fabric large enough to cover the entire top portion of the quilt.
Pin all three layers (top, batting, backing) together and then machine stitch along the edge of each panel to connect the layers.
I also decided to add a few stars to embellish the embroidery and help fill in the blank space in the panel.
IMPORTANT NOTE: You want to make absolutely sure that there is no way small appliques like this can come off and potentially get into the hands or mouths of little ones and pose a choking hazard.
If you decide to add small appliques (like these stars), it’s very important to make sure they are stitched securely to the quilt. I stitched these stars by using the sewing machine to stitch throughout the center of the star about 7-8 times over. The star tips are loose but the star itself is safely secured.
Quilts have three layers made up of the top, batting and backing.
The top is what I just created in the photos above, the batting is a layer of cotton and the final layer is called the backing.
Use quilting pins (which look like safety pins) to hold the three layers in place during quilting. You’ll have to maneuver around these pins when during the actual quilting process.
The process of stitching these three layers together (usually with a decorative stitch) is called quilting.
I used a free hand quilting stitch called stippling which resembles small puzzle pieces.

My sewing machine allows me to drop the “feed dogs” or the teeth that help pull the fabric through the machine during regular stitching.
Dropping the feed dogs allows me to easily move the machine stitch around the fabric in a free-hand motion.
Stipple (or use your favorite quilting stitch) to connect all three layers of the quilt in the sashing area.
Once I finished all my stippling, I decided to scallop the edges of the quilt for a more whimsical presentation.
I use a mylar template and a water soluble marker to mark the scalloped edge.
Then, simply follow the marking and cut the scallops all the way around the quilt.
If you care to, you can revisit my previous quilting posts to see some of my other scalloped edged quilts.
Add even more fun to the quilt by adding a colorful border. I love this green and white polka dot fabric.
If scalloping a quilt, you must use what’s called continuous binding which is cut on a bias and is more flexible that straight binding.
Continuous binding attaches to curved edges much easier.
Many people shy away from making continuous binding because they think it’s too hard to construct.
It’s actually quite easy.
Here’s a link for instructions on making continuous binding.
This next step requires lots of pinning but just take your time and you’ll get through it just fine.
Pin the continuous binding to the FRONT of the quilt along the scalloped edge.
Carefully stitch 1/4-inch seam all the way around.
After stitching, remove pins and fold the loose edge of the binding over to the back of the quilt.
Press with a good steam iron and then hand stitch the loose edge of the binding to the back of the quilt.
I love how the stippling pops against the red sashing and the way each panel is clearly defined.
This is a great gift item from babyhood that can now be used well into toddlerhood and beyond.
Since this was a gift, I used a raw piece of the binding to tie the finished quilt into a big bow for another fun look.
Adorable, huh?
This is the first time I’ve ever made something like this and I’m happy with the way it turned out.
I almost wanted to keep it for myself.
Beloved baby items can be hard to part with but as you can see, repurposing something like this can give the item new meaning.
Of course, with new meaning you’ll also be able to create a whole new set of beautiful memories.
So, next time you browse through those baby keepsakes you’ve been storing in a basement box, consider how you might be able to give a sentimental item a brand new lease on life.
Let me know what you come up with. ♥
WANT TO SEE MORE FUN DIY PROJECTS?
Check out the link party over at Beth’s at Home Stories A to Z for tons of great ideas. You’ll also flip for the fun projects over at Trish and Bonnie’s get-together at Uncommon Designs. There is no shortage of fantastic DIY projects at Lucy’s Inspiration Gallery over at Craftberry Bush. Swing by these great blogs to get even more creative juices flowing. 


Excellent idea.
Gorgeous as always!!!
Very fun idea Lisa!
Love it! Going to use some of your ideas to turn my son’s crib comforter, bumpers, and possibly his hanging diaper bag holder into a full-size blanket of some sort…before he decides it’s not cute anymore! Hope mine turns out as nice as yours.
That’s wonderful, Jana.
I’m thrilled that you’re inspired.
This was a fun way to repurpose a lovely bumper and the new mom loved it.
I think her son still uses the quilt on the edge of his bed after all these years.
Let me know how yours turns out and send me a photo if you can.
Happy holidays to you.