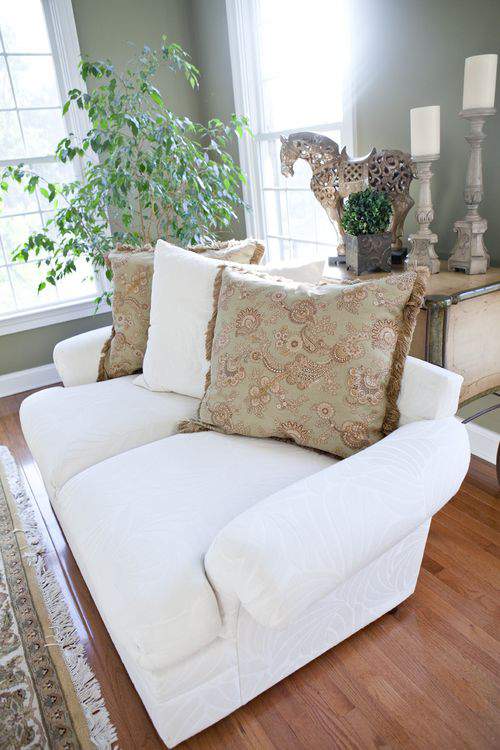
How many times have you looked at a piece of furniture and wanted to give it a new look? That’s how I felt about this off-white sofa.
While re-upholstery would be ideal, I opted for an easier (and less expensive) solution with a quick fringed pillow project. 
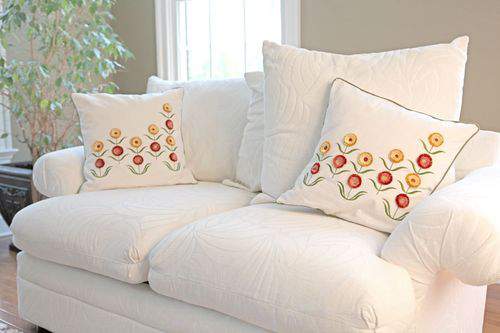
This is how the large sofa pillows used to look. All off-white and a bit boring.
Initially, I added some needed color with my embroidered floral pillows (you can see that earlier tutorial if you click here).
However, with other recent changes to this room, it was time to change the look of the sofa too.

My color inspiration for the new pillowcases was this area rug which contains some of my favorite soothing, warm colors.
My goal was to pull the tans, greens and caramel colors from the rug into the rest of the room and at the same time tone down that off-white sofa.

I found this great upholstery fabric with all the requisite colors. The fabric was on a clearance table and the fringe was on sale too.
It’s always fun to create projects at bargain basement prices.

Measure the length and width of the existing pillow and add a 1/4-inch seam allowance to each side and cut down to size for the front of the pillow.
If the existing pillow is made of heavy-duty fabric you may need to add to the seam allowance. It’s better to have a square too large, than too small because you can always cut it down in size if needed.
NOTE: Typically, you would need to cut a second square of equal size for the back of the pillow. However, for my pillows I cut two additional squares because I’m using an overlap-style backside which is detailed further down in this post.

Pin the fringe in place all the way around your front square. Make sure the fringe end is facing inward toward the center of the fabric. In this case the brown top-stitching holds the fringe in place.
Stitch the fringe in place making sure your stitch line covers the bottom top-stitching which is seen here as a trio of white stitching.

I like to work in assembly line fashion when working on multiples of the same project.
In this case, especially with such large fabric pieces, I think this saves time and also helps keep all the pillowcases consistent in appearance.

I wanted to see what the fringe looked like so I pulled the bottom thread which secures the loose fringe ends.
That’s a bad idea because that makes it really difficult to keep the loose ends in place during additional construction and stitching.
I suggest you resist the temptation to pull the bottom fringe thread until the pillow is completely constructed. Trust me, it will make life easier.
Pick up some matching piping which you can find at any fabric store.
This color is called Goldenrod.

Remember, I cut two large squares for the back portion. Set one square aside.
Cut @3/4 off one of the squares. I’ll call this Piece A. These two pieces will hold the piping in place.
Pin the piping between the two sections of Piece A.

Use a zipper foot to get as close as possible to the edge of the piping sandwiched between the two pieces of fabric.
A zipper foot is a standard attachment that comes with most sewing machines. If you’ve lost or misplaced the yours, you can easily find a replacement on-line or at your local sewing shop.

After the piping installation, open the two fabrics and put wrong sides together. Give the piping seam a good steam iron for a flat, crisp result.
NOTE: The color variations in the shots are due to inconsistent lighting when photographed.

Top stitch about 1/4 above the piping for a perfectly finished edge.
This photo shows three of the “piped” sections which are now ready for another pretty embellishment.
Because my pillow is oversize, I wanted to dress up the backside with more than just the goldenrod-colored piping.
Embroider a design by hand or machine just above the piping line for a gorgeous added element of interest.

Next, turn over the edge of backside Piece #B, stitch about 1/4″ and then turn it over again and topstitch for a clean finished edge. This is the edge that will fit behind piece A.
Here’s a look at how the backside (different embroidery design) looks prior to construction.
When Piece A and Piece B are positioned, the length and width should match the length and width of your front section. You’ll most likely have to trim the lower edge of piece B to fit.
This type of construction creates a flap and eliminates the need to install a zipper and allows you to easily slide a pillow into the cover and remove it when desired.

Carefully pin two backsides to the front side with right sides facing each other.
Pay close attention to the seam area where the flaps come together which is where you’ll have multiple fabric layers.
Make sure all raw edges are pinned securely and all fringed areas are facing toward inside of the pillow and away from the seam before stitching.
Stitch all the way around the square with additional reinforcement along the side seams at the flaps.

Turn inside out through the open flap that was just created in the back.
Inspect the seams on the right side along the fringe line to make sure all layers are secure inside the side seam.
If you spot any raw edges that are not sewn within the seam, simply reopen surrounding seam, re-pin and stitch again.
When I initially stuffed the sofa pillow into my new cover it was a bit too tight and fitted for my taste.
That’s because I didn’t take into account how the thickness of the original pillowcase would affect my new pillowcase sizing. Not to worry, this is an easy fix.
Carefully open the seam in the original pillowcase. In this case the original pillowcase is filled with cotton fiberfill.

Because these pillows are so old, the cotton filling pretty much retained a pillow shape even after the pillowcase was removed which makes it a lot easier to remove and stuff into the new cover.
Measure the size of the original pillowcase and create another pillowcase out of muslin or some other thin fabric.
Muslin is a thin, lightweight cotton fabric. Stuff the fiberfill into the new muslin cover.

You can close the open seams by stitching by machine or hand.
Because of the awkward size of the pillow, it was easier for me to just slip-stitch the openings by hand.

Stuff the muslin covered fiberfill into the new pillow covers and you’re good to go.
I love thick fringe like this. Here’s a look at the back of the new pillowcase set.
I decided to give each backside its own design which makes these pillows a little more unique.
Here’s a closer look at the individual embroidery designs.
The designs used here are all part of the same embroidery collection called Victorian Lace by designer Jenny Haskins.
This is one of those little details that few will probably ever see unless they turn the pillow over some reason. Still, I like knowing these designs are there.

Also, by adding a large embroidered element on the back of the pillow like this, you potentially make them reversible and more versatile.

Don’t forget to store your original pillowcases in a dry location in case you decide to go back to the original look of the sofa.

The fabric for this project (8 yards), fringe (12 yards), piping (2 packages) and muslin (4 yards) ended up costing me under $100 for all four pillows.
Now, that’s certainly a lot cheaper than re-upholstery.

We use this space as a music room which been a work in progress for a while with new paint (Hancock Grey by Benjamin Moore-love it) and built-in bookcases on the opposite wall.
Here’s a view of the space and new pillows looking in from the other side of the room.
You can read more about the makeover evolution of this music room in an earlier post entitled “At Home with Books”.

Now, I need to turn my attention to window treatments for this room.
I already have a good idea about what I want on these windows. If I can’t find them, I may have to try to make them myself.
We’ll see about that.
Meanwhile, this was an easy, inexpensive way to introduce fresh color, contrast and texture to the space.
Overall, I think it made for not only a much prettier room but pitch perfect pillows too. ♥

Thanks for this post Lisa. I’ve had fabric and trim for some towels and pillows but the pillows were an issue for me. I wanted to create the overlap on my pillows but was unsure of how to accomplish this neatly and I really didn’t want to purchase a pattern just for a pillow. Your post is right on time:) And your pillows are lovely as usual.
WOW! Your pillows turned out great! I love how you added different machine embroidery designs to each of the backs of the pillows. Great idea! I do machine embroidery and I just LOVE it!! While I tend to go with darker more reddish colors in my house I really do like your color choices also. Very elegant.
Love the “new pillows”. I am working on a new project in my sun room and am making pillows for that right now. Love how you added the embroidery to the backs, a special little touch that takes them from better than “ordinary” to “absolutly fabulous”!
Beautiful Lisa! I love your pretty colors — and of course, it’s always fun to see the clever ways you use you machine embroidery.
I just had an estimate for a valance for our kitchen. One valance — 150″ long. $2500. After the smelling salt revival, I decided I’ll be making my own. It might not be as professional, but for that price, it will be fine! Good luck with your window treatment shopping!
I found your blog through blogging for bliss and the timing is great because I just moved into a new apt, and have my sisters old couch that needs some touch ups, so this post was inspiring. Your pillows turned out beautiful.
Nice work on those pillows and they achieve just what you were after: a fresh new look without spending a fortune. Nice tutorial, as usual. Thanks.
Soo Elegant! Not sure if I like the front or the backs better!
Love this tutorial. Your posts all always so high quality. Your work is equally!
http://www.mel-designs.typepad.com
Thanx to sharing this notes.It really informative for us.It very interasting idea.
Really like these pillows. So elegant and classy, yet still cosy and in keeping with the sofa, Well done 🙂
You have made such a perfect pillows. I do machine embroidery and i just made at my home. I appreciated for your work. It very interesting idea.
I really like your awesome work. You have done amazing pillow covers. I really appreciate your work. I really like this types of hand made items.