
Lately, I’ve been drawn into tackling handbags. It’s funny because I’m not much of a handbag carrier. I just enjoy trying my hand at designing and making them.
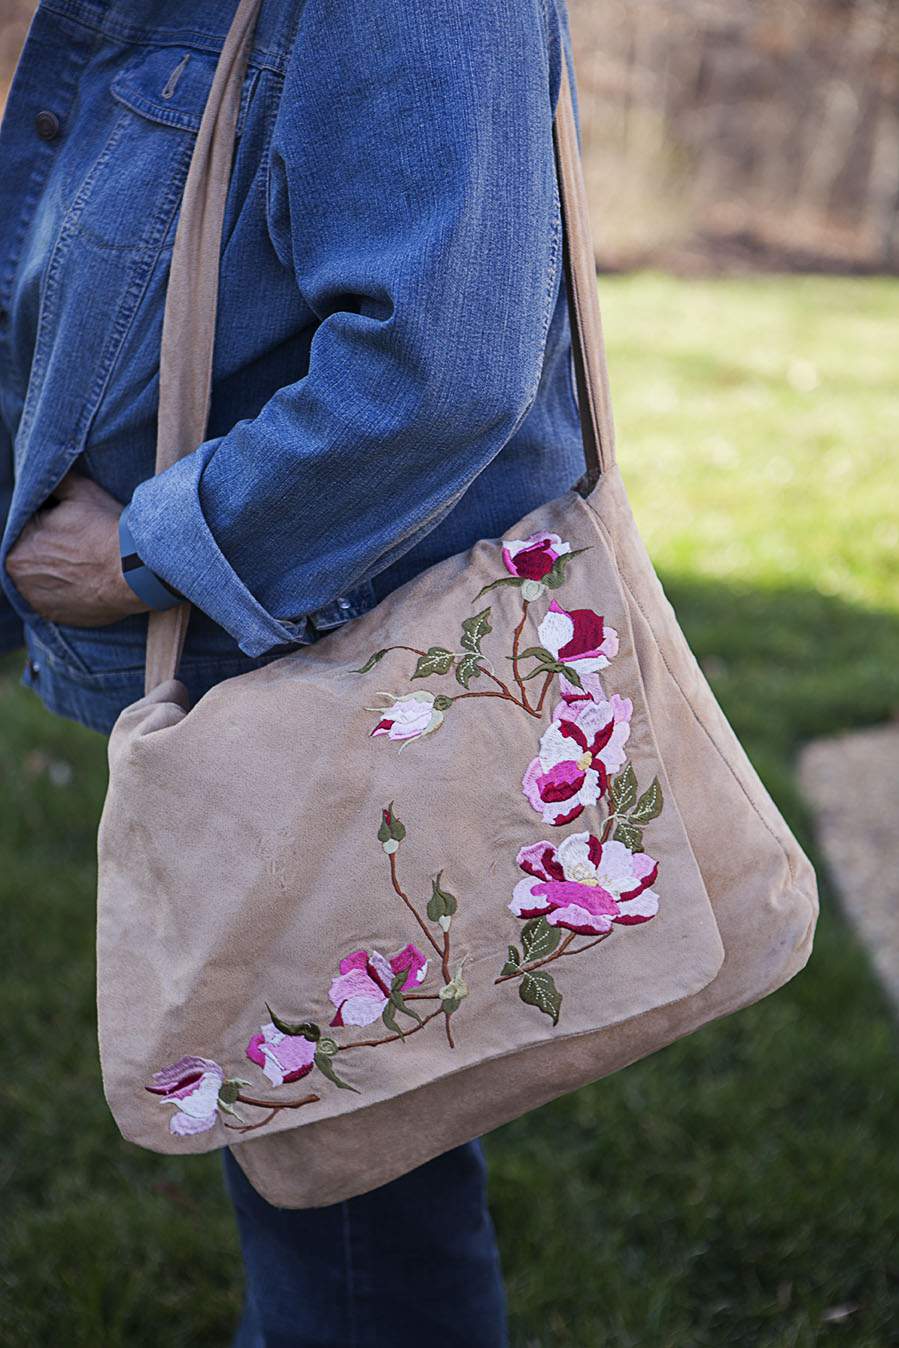
My latest project is a Messenger bag. I love this bag because I was able to add a few special touches to create a really beautiful and not-so-ordinary take on a classic bag shape.
NOTE: I used See & Sew pattern #B4583 from Joann fabrics as the basis for this project. As you’ll see, I tweaked it along the way for more personal customization.

I think the most striking thing about this project is the wonderful embroidery on the flap.
Hmm, and that’s precisely why a certain little girl in my house claimed this bag for herself as soon as it was finished. Now I have to figure out how to get it back.
While I work on that plan, allow me to walk you through the easy steps to create this great bag.

First of all, I found a great fabric called polysuede. It actually looks like suede but as the name suggests, it’s a polyester blend but it still has that suede look. It’s a bit softer and a much lighter fabric to work with than 100% suede.
For the lining, I used a wonderful cotton with a paisley pattern that also contained the same taupe coloring as the main fabric. I found both of these fabrics at Hobby Lobby craft store. I love how these two textures look together.

If you add any embroidery to this project you’ll have to apply that first before any actual construction on the bag begins.
If you’re going to add embroidery to your flap, I suggest you cut the fabric about 1/4-inch larger than the pattern all the way around. This will accomodate any shrinkage that will likely occur during the embroidery process. You can always trim the flap down to size once the embroidery is completed.

In the photo below, you can see the slight puckering around the rose design. That’s the slight shrinkage I was talking about and it’s often created when stitching out very large designs. When using really large embroidery the fabric tends draws inward a bit as the embroidery is stitched out.
The additional 1/4-inch of fabric all the way around, should be just enough to make up for this shrinkage.

The rose embroidery designs I used for this project are from an embroidery collection called Roses for Mary by Jenny Haskins . Haskins is well known in embroidery circles for her complex and elegant designs and projects. Her website also has quite a few beautiful free embroidery designs for downloading too.
If you have an opportunity to pick up her corresponding Roses for Mary quilt book, you’ll be amazed at how she weaves these beautiful embroidered roses and buds from her collection into a spectacular quilt. It’s total eye candy.
The lucious picture on the cover prompted me to buy this book along with the embroidery disk at first sight. I have yet to tackle this incredible quilt project but perhaps one day I’ll get around to it.

If you’re interested in seeing more of Jenny Haskins’ fabulous designs, she publishes a fabulous quarterly Austrailian magazine called Creative Expressions and it’s available at numerous locations including Barnes and Noble book stores and Joann’s Fabrics to name a few.
The cover photo below is from the latest issue. Isn’t that heart pillow just beautiful? It’s so delicate. Trust me, there are loads of delicious projects in this issue. I generally buy the magazine just to drool over the extraordinary and intricate embroidery.

Getting back to the messenger bag project, each embroidery pattern has a matching vellum template which depicts the design and can be easily printed out. This template will help you place the design exactly where you want it on the fabric.
It’s actually fun to plan out a big project like this with multiple embroidery designs. Just play around with the vellum sheets turning them sideways and upside down to see what overall design best suits your eye.

If you are using multiple designs, you definitely need to plan out how all the designs will be arranged on your fabric. For example, in some cases you may want a particular design to overlap another. If that’s the case, it makes a big difference in which pattern you stitch out first.
Advance planning will help ensure a more satisfactory arrangement of the ultimate design.

Because of the various overlaps in design in this project, I had to jump around to various areas of the fabric to stitch out each design. As long as you clearly mark your fabric, it’s pretty easy to keep track of all the different design assignments.
The benefit of using polysuede is that it’s wonderfully washable. Just remember to always use a water soluable marker when marking your fabric.

Here’s a look at the unsewn flap with the finished embroidery. I ended up arranging six different rose designs to complete this final large rose pattern.
If you look closely you’ll see that I did end up with a few gaps in the branches. That’s the kind of detail I hope to perfect the more I practice my design placements and positioning. Despite this flaw in my stitched-out design layout, I’m still pleased with this first-time effort.

Gently wash the markings from the fabric and let hang dry completely. Be careful not to over-wring the fabric to prevent damaging the embroidery.
After fabric is dry, iron flat and resume construction of the bag.

You can’t see them in this photo, but the straps for this bag are already sewn into the sides of the bag. Remember to add strength and reinforcement to the straps by stitching their seam multiple times.
Most of the pieces needs fusible interfacing to add stiffness and that’s the white material you see on the outside of the project in the photo below.

For the pockets I cut two pieces of lining fabric measuring about 7-inches X 10-inches.
With right sides together stitch all the way around leaving a small opening in the seam to turn inside out.

After turning, press the resulting rectangle with a good steam iron. Then stitch across the top edge about 1/8-inch. Fold this stitched top down about 1/2-inch. Stitch again across the top of this folded down piece about 1/8-inch.
This creates a nice finished edge and mini flap for the top of your multi-pocket.

Determine the pocket placement on the right side of the lining. Stitch the rectangular pocket to the lining down both sides and across the bottom, leaving the entire top edge of the rectangle open.
Once this rectangle is secure, double stitch down the center of the rectangle to create individual pockets. I did this to two separate areas of the rectangle to form three pockets.

I also included a stiff base for the bag using some mesh canvas.
You can find this mesh canvas at most sewing stores. It’s pretty easy to work with and comes in various sheet sizes.

I created a small pocket on the bottom of the lining by stitching a matching fabric strip directly onto the wrong side of the seams already in the bottom of the lining.
After cutting mesh canvas down to the desired size, simply slip it into the pocket. This will be completely concealed once the bag is turned inside out because the mesh will be sandwiched between the wrong side of the lining and the wrong side of the bag.
It really does give the bottom of the bag some much-needed extra support.

The large front flap of the bag is already basted across the back of one right side of the bag at this point. The lining uses the same pattern pieces as the bag itself so it’s basically a duplicate of the bag. After adding the mesh base, simply pin the lining to the bag portion with right sides together.

Stitch all the way around to attach lining. Remember to leave an opening large enough to turn inside out.
Gently turn the bag inside out bringing all the pieces to the bag through the opening in the lining attachment. With only a few pattern pieces to deal with, this Messenger bag takes shape very quickly.

Press the top edge where the bag and lining meet with a good steam iron and then topstitch all the way around about 1/8-inch. This not only closes up the last opening, it also gives the edge a nice finishing touch.
Here’s a look at the inside multi-pockets in the photo below. I like the idea of having lots of little compartments for various storage and you can see this was a very simple effect to create.

I loved working on this project and tweaking different elements to create a more unique, original bag.
While I added machine embroidery to the flap, you could also apply hand embroidery for an equally stunning look. I think just about any embellishment would be a nice touch.
There are loads of possibilities. ♥

Thanks for stopping by.
See you back here next time. ♥
ahh-maaz-ing … this is absolutely fabulous … I love everything about it.
that bag is absolutely beautiful and you are one amazingly talented gal!!! You always make the most beautiful things!!
Its beautiful!!
Oh Lisa, That bag is amazing!!!! It’s like a high end boutique piece.I love it!
Jen R
WOW, i love it! I especially like the pockets inside.
Wow, you do lovely work. I love the flowers, you must have a great machine. That’s defiantly a keeper!
Lisa that bag is fabulous!
can i buy one of those?? holy darn! I’m serious!
So…are you going to sell these? Amazing, this is! I love it so very much and I know without a doubt this is something that I could never be able to do! =) But I can enjoy feasting my eyes on it here on your blog! Thanks for the inspo!
You are without a doubt the most creatively talented person I have ever “met”! …and I swear you should get some kind of bird dog fee from the sewing machine comnpanies because I am sure you have generated some sales. I still have not purchased one – but I know I will.
Have a great day!
I love it Lisa! The flowers are amazing the lining and pockets coordinate perfectly.
Karla
Just FAB! Now you KNOW you just made me want a messenger bag! LOL
gosh… every project you do is stunning!
Hey Lisa-
Great bag. Love the suede, and paisley together. As always love that you took the time to make a tut. for everyone. I don’t know if people realize how much work that is. You’re the sweetest. I just posted on my blog, and I’m asking all my quilt buds to help answer some questions for me. If you don’t mind, see if you can leave me some guidance. I’d really appreciate it. Thanks for being you! Have a great week!
Absolutely beautiful bag!! Incredible tutorial and finished project!!
blessings,
kari & kijsa
Such a joy to drop in here to see all your wonderful creations. Love the bag and the embroidery design is just beautiful! I love that quilt featured on the book! Oh my….it is stunning!
OMgosh I luv this bag… Sending you my addy for one 🙂
Maggie
Absolutely beautiful bag!! Incredible tutorial and finished project!!
blessings,
kari & kijsa
Such beautiful embroidery (I really covet your machine)! Love it Lisa!
Manuela
I’ve awarded you the Arte Y Pico (Art & More) awards … check out this post: http://ingeniousinkling.typepad.com/ingenious_inkling/2008/04/snow-snow-go-aw.html
Lisa! What a gorgeous bag. I can’t blame your girl for claiming it. I would, too! I bet that would be just as gorgeous in a nice linen blend or even a pre-embroidered linen/linen blend for those of us without an embroidery machine.
Wow Lisa your bag is so incredible, I adore it!!! Loving that you do the embroidery yourself too and the combination with the faux suede is just gorgeous. Thanks for the tutorial, your blog and your creations are so lovely!
I love that spring bag! I am feeling so dowdy with my boring black one. Gorgeous!!! Come link this spring creation to my post on Spring Fluffing! This is amazing and such a great tutorial!
Melissa
Can’t wait to see your answers to my quilting questions. I appreciate you helping me with your knowledge. Talk to ya soon!
ABSOLUTELY BEAUTIFUL!
You really have a talent! WOW!!
The bag is beautiful!! And I would have looooved to make one. But as I don`t see all the parts, and how you sew it together I don`t know how I could make one. It seems quite easy though..
I really have to buy a book really really soon, with different bag tutorials. I would have loved to make my own summerly looking bag!
And thanks Lisa for your visit, all your supporting and wonderful words that you have left me!! (Even your e-mail..)
I am so grateful to have met you, you make me totally believe in myself and my work!! THANK YOU!!
A big hug for you!!
Your blog is a great place to learn. I love your work. I agree with the comments above that you should be getting royalties from the sewing machine companies. I have a Janome and have been considering upgrading to an embroidery version. Especially after seeing what all you do with yours. Your tutorials and pictures are absolutely wonderful…so when is your book due out?
That is lovely!
Wow! The embroidery on that bag is just amazing!!
I am so happy to see that real crafting and sewing and quilting is back “in vogue” again. My grown daughters thought their childhood home was so “colorful” that now they seem to want to decorate their homes in brown. It’s dreary to me. I applaud you. I loved crazy quilting; adding all those beads and hand embroidery to clothing and quilts. I mainly garden now, as fine sewing is a little beyond the arthritic changes post-surgically on my hands. But I’m so glad to see things like this! I feel redeemed!
Brenda
Wow! It’s beautiful! I love it!
what a beautiful bag. i would have claimed it too.
Beautiful! Love the fabric combination, and gorgeous embroidery!
Beautiful! Love the fabric combination, and gorgeous embroidery!
That embroidery is beautiful. I have yet to try machine embroidery, but your site is so inspiring its definitely gone on my urgent to do list! I have been enjoying working with some faux suede on some projects lately – I love the muted effect of the exterior, contrasting with pretty surprise linings. I hope to be posting some pretty pics soon…
Lisa this tutorial is awesome. You are very generous sharing with your readers. I am learning so much things reading blogs lately. I started to make bags reading tuts like yours! These materials like Polysuede and mesh canvas are new to me. I never used them. I’ve seen this canvas in the stores but I did not know what to do with it. Hmmm, must try it.
I’ve been making bags for people, but this month I want to make some for me. I will share on the blog in some days..
Take Care, thanks so much for this tutorial.
oh wow! What a gorgeous bag….i’d steal it too, if i was in your house! LOL
I don’t know how you did such gorgeous embroidery, even with the help from your machine! WOW!!! I’m very impressed…Gorgeous! I love that style of messenger bag, too.
Happy Spring,
Laurie~
you are just so amazing ! That bag is beautiful!
Lisa, what a beautiful bag!!!!
Kind regards
Sonnja
Beertje Zonn
I love it. Fabulous. Use it as a tote, line it for light groceries or even as a purse or weekender. So cute. This one’s a real winner.
PLT
this bag is really really beautifull!!!
Je ne pense pas réussir une aussi belle broderie … Tu as beaucoup de talent !
Lisa, that bag is beautiful. The recipients of your future bags will be very pleased!!! I love the embroidery, gives it a feminine touch!!!
Can I be on your gift list ;O)
Great job!!!
Hey Lisa,
You know how I feel about that bag–gorgeous–love it! You really jazzed up an ordinary messagener bag pattern–the embroidery really makes it special.
You continue to inspire…..
Okay – I have a question for you…okay – so it is going to be a couple of questions …ha ha..
1. If you were in the market for a new machine and did not care if it had the Disney designs with it – what brand would you buy?
2. Do you know what the largest hooping area is on a machine that is not commercial?
3. Did you teach yourself or did you take classes? If you took classes – how valuable were they?
I have been trying to do some internet research on different machines – but feel the info is vague at best…and if I go to a specific manufactures web sight – they all make it sound like their machine is the perfect one…so I am confused to say the least!
Cost is not a huge factor…but know I would not spend over $3000 for something like this and preferabley a bit less. Okay – so I actually would spend more ..but only if I knew beyond a shadow of a doubt that the machine I was buying would last, and I would not be left wanting more options after a couple of years.
Thanks so much! My birthday has come and gone and am thinking maybe Mothers day …or even next Christmas!
wow! i really like the look of the polysuede, hmnn… other people’s blogs are so dangerous to the pocketbook!
once again, you’re embroidery is amazing!
The bag is fantastic. I wish I had an embroidery machine now, that much stitching would take forever by hand!
Hey Lady, gorgeous bag!!!! I absolutely love the embroidering. You are one so amazingly talented and crafty. You make me want to try machine embroidering again. Thanks for the great tips too. They will come in handy.
xoxo
Your bag came out beautifully! Thank you for stopping by my blog today so I could come and find you. Lovely work you do.
Kindredly,
Lynne Laura
You are absolutely AMAZING!
This design and the artistry and the workmanship is incredible! You create Master Pieces!
Sandra Evertson
Thank you for visiting my site and for the nice comments.
I love your beautiful bag and I understand why your daughter will not give it back to you.
/ Poppins
I haven’t posted on your blog before but I want to tell you that everything that you make is amazing! It is all beautiful. You are very talented.
Oh Lisa, the bag is BEAUTIFUL – really gorgeous!
xo,
Kim
I love the bag!
The embroidery work is so pretty.
Kimberly 🙂
LOVE, love, love the messenger bag. I have to have one! I am going to try it…since your blog is like watching Martha Stewart, I might actually be able to pull it off.
Wow, you MADE that? That bag is gorgeous. I bow to your talent. You always make beautiful things!
You are a very talented woman. I’m inspired by the lovely detail and color choices…I love fabric but do not sew…Your work makes me believe that I can do it or should at least try…Time permitting….Take a visit to my blog between stiches… Fay
WOW your stuff is amazing, I would love to be able to make more stuff but sewing is not my thing. I cross stitch and needle point but have never been able to use a sewing machine. I have also loved lace pieces and now I know how they are done I am even more amazed at the patterns. you are very talented. Did you always like to craft? and how did you get started? Myself I started as a young child with tapestry and over the years have tried new things. I love to make things and constantly looking for new things to learn.Your work is very inspiring keep up the good work.
Once again, Etsy! 🙂
I AM INTERESTED IN BUYING UR BEAUTIFUL MESSANGER BAG
I think this is the first time I’ve commented on your blog, though I’ve been blog stalking for a while now. 🙂
Love all the sweet pictures of your kids and your words to go along with them. What little blessings you have in your life.
Just felt like saying Hi today!
I swear you should get some kind of bird dog fee from the sewing machine comnpanies because I am sure you have generated some sales.
I haven’t posted on your blog before but I want to tell you that everything that you make is amazing! It is all beautiful. You are very talented.
Embroidery is so much fun and I love the ideas you have here.
I don’t see any instructions on how to put the bag together and how to sew the straps in. This will be my first time trying to do a Messenger Bag. I won’t be able to do the flowers. I don’t know how to construct the actual body and lining and how to put the flap and straps on.