
Isn't everyone ready for Spring? I know I am. Officially, the date on the calandar tells us that Spring has finally arrived. I'm keeping my fingers crossed that we're finally done with additional snowfall in my neck of the woods. Of course, around here you never know what else Mother Nature has in store.
Even though temps in the Chicago area are still chilly, I think my latest project suggests the season will soon be on the brink of full bloom.
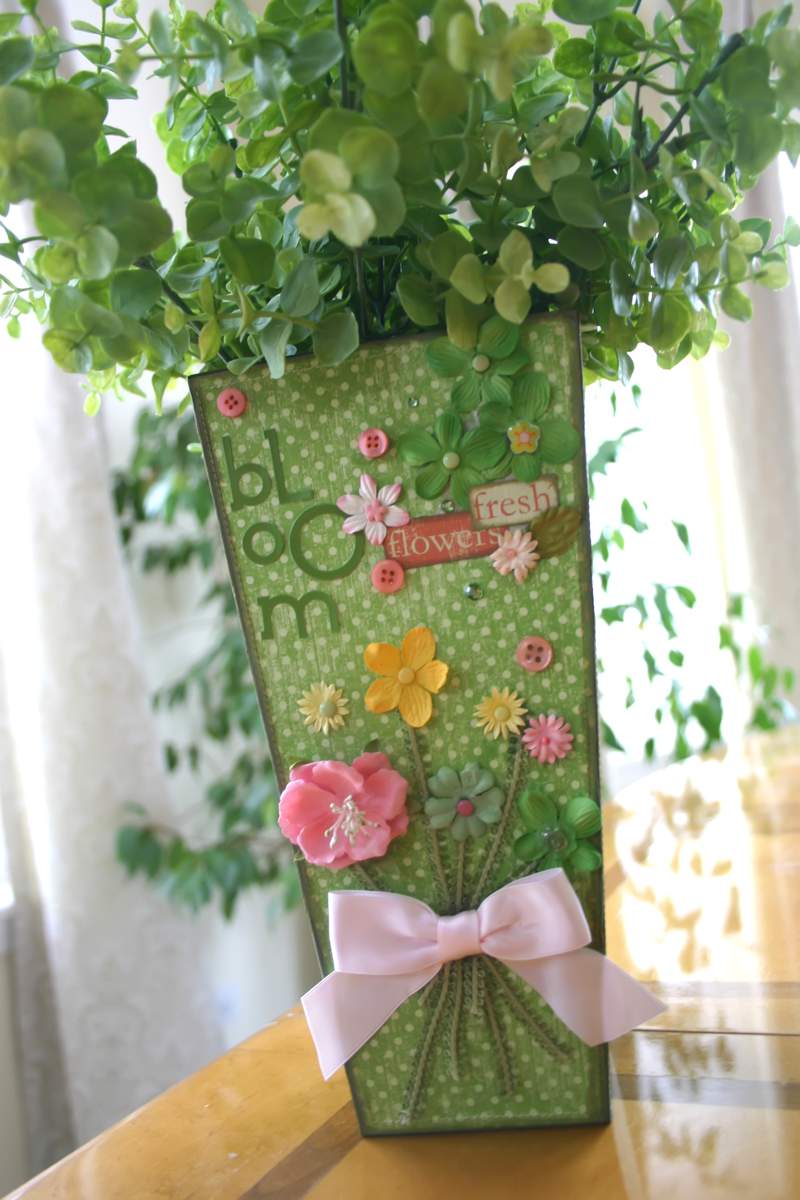
This is another super easy project that will take you no time at all to complete. Just start with a wooden vase like the one in the photo below. This one is already pre-treated so you don't have to do anything to prepare it ahead of time for decorating.

I obviously have a thing for green polka dots these days. Remember the Amy Butler purse I posted a few weeks ago?
Well, green is one of my favorite colors and this particular patterned paper is so fresh and fun. This paper from Bo Bunny's Summer Picnic line just screams SPRING.

Just lay the vase down over the wrong side of the patterned paper and trace the outline of the vase. You'll need to do this four times-one for each side of the vase. Mark your outlines as close together on the paper to maximize available space and get as many outlines as you can out of one sheet.

After tracing the vase outline, cut each pattern out. While I decided to cover the entire vase in the same patterned paper, this would also look great covered with alternating coordinating patterned paper too.

Before attaching the outlines to the wooden vase, I added some stitching to the paper outlines with my sewing machine. Just sew along the side of the paper about 1/4-inch for a little extra detail.

I usually add some machine stitching to my scrapbook pages and paper crafting projects. Stitching really adds nice texture to any paper project and is really a nice subtle finishing touch too.
Just remember to never run your machine needle over any kind of tape or adhesive. If the needle hits adhesive it runs the risk carrying glue down into your sewing machine internal parts and this could potentially gum up the machinery and cause damage to your machine.

At this point just adhere the paper cutouts to the wooden vase. Line up the outlines to fit each side of the vase. I used a glue stick because it's thick, not messy and provides really good coverage for this project.

Once all four patterned paper outlines have been adhered to the wooden vase, you may want to add some rubber stamp ink along the edge. Edging gives the project a nice aged finish and it also helps to blend and conceal the edges of the patterned paper along the seams.
Edging is a great technique to apply to scrapbook layout and page elements too.

Now for the really fun part. Just decorate to your heart's content. I decided on lots of colorful embellishments like flowers, buttons, brads, a little bling here and there along with frilly ribbon for flower stems.
Like I said, I'm in the mood for Spring and this certainly fits the bill.

Here's a list of the products I used for this project. Wooden vase: Prima. Patterned paper: Bo Bunny. Flowers: Chatterbox, Prima. Ribbon: Anna Griffin, Rhinestones: Heidi Swapp, buttons: Foofla, Brads: Accent Depot, Cactus Pink, Sticker letters: 3 Bugs in a Rug, Cardstock words: My Mind's Eye.

This is a good time to let you know about a craft inspiration blog I know about. Carla at Thriftin' and Crafting will be hosting a monthly inspiration challenge on her blog to not only to get your creative juices flowing but also to share fun projects with fellow crafters. You can find out more about her latest inspiration project if you click here.
Meantime, I just love the fun colors in my vase project which only took about ninety minutes to complete. This was also a great way to use lots of product that I already had on hand.
Of course, I can't wait until everything outdoors actually looks this green and wonderfully colorful. Yes, it's been a long winter alright and finally Spring has sprung.

OMG what a fantastic project! I will deffinitly book mark your site. thanks for visiting my blog, I love when my return click always takes me somewhere interesting.
I saw that little bag, it was soooo cute, im going to have a go at making that also!
Oh that is so cute. I love the colors and it feels just like spring.
I love your blog and visit often.
Thanks for the great craft! °Ü°
This is super cute and such attention to detail! This is great. I hope you’ve submitted this project somewhere, it is magazine worthy!
Jen R
this is just darling!!!
where do you get the vases? i haven’t seen those yet.
oxoxo,
jessi
Lisa:
This is wonderful, luv the springy flowers embellies 🙂
Maggie
wow… that is stunning. You have some amazing talent girl!!
Isn’t this sweet! Thanks for the tutorial. Green is my favorite color, too, and I adore the faded polka dots.Spring seems like a pipe dream now that we are expected to get snow again tomorrow. Ugh!
Such a pretty vase! I wish I was good at those crafty types of projects – I think I work better in fabric. 😉 Oh, and I looked at your Amy Butler purses – they are stunning! Great work!
TOO CUTE! Perfect as usual! LOVE that you always take the time to make a tutorial. Thanks for mentioning my little challenge. So fun that lots of people are participating. Do you mind if I change the link of your post in the Mr. Linky box on my blog so it goes DIRECTLY to this post? I found out how to fix that now. Let me know if that’s OK with you so this post doesn’t get “lost” in the shuffle. Happy Spring. Your project makes me smile!
That’s a gorgeous vase! You made it look so easy but I doubt 90 minutes for me would result in something so beautiful – I’d be surrounded by a soggy mess!
This is just gorgeous…and you made it look so easy. Great tutorial!! Wishing you a wonderful “Spring” day!!
I love seeing all the fresh projects and inspiration throughout blogland that come with the changing of the season. Your “Springy” vase is really cute. Thanks for the tutorial.
Aloha!
Very cute Lisa! I love it!
Love this vase! We’re still stuck with gloomy wet cold weather here in the northeast 🙁
Lisa, what a beautiful vase. I am so glad that spring is here (officially), but I’m waiting for it to really feel like spring!!! Hope you have a great Easter weekend!
What a cool project! I really enjoy your step by step tutorials. Also, I really wanted to tell you how sweet it was to meet you in Chicago. The event left me feeling inspired and recharged. But maybe like you said it’s that it’s Spring!
Stop! Enough of all these cute ideas! There just aren’t enough hours in the dayyyyyyy! LOL!
So very pretty! I agree with Mary, there just isn’t enough time in the day, but I’ll keep on trying! =) Thanks for sharing as always!
I won’t have time to make this pretty item because I am preparing my little garden plot for Spring plantings, but, I thoroughly enjoyed the pictures and the tutorial. The post is so colorful and cheerful, it has to raise our spirits as this cold, windy, wet weather drags on. Note: time to plant snow peas for those early pods for delicious stir fry dishes.
I love it!! What a wonderful idea. We are heading into Autumn here, but I’ll keep it in mind for spring. 🙂
what a fun project!! And so springy and bright.
This is ADORABLE! I love how colorful & cheery it is! I may have to make one for my craft room! Thank you so much for all the ideas and inspiration that you share with us. Your work is amazing!
Love the vase Lisa! Great tutorial as usual.
Check my blog. I posted my inspiration project! Happy Easter!
Great to find your nice blog!!! What a vase! I really love it…and your tutorial is fantastic – really nice photos too! I´ll be back soon – that is for sure! 🙂
~Annie in Sweden
What a wonderful project Lisa! Perfect for spring.
Karla
What a fun and fresh spring project! When are we going to have spring weather here in Chicago? Hope you didn’t get hit to hard where you live. We got a light dusting the other night. Well hope you have a very Happy Easter!
Super cute!! And Springy!!
What a gorgeous *green* project! 😉 I love it! You’re so awesome for being generous with all the projects you come up with! Happy Easter!
~Angela 🙂
Lisa-
you are one talented woman! I am so happy you left me an email after visiting my blog as it led me back to your wonderful blog! I am adding you to my favs!
Have a wonderful Easter Sunday!
blessings,
kari & kijsa
Have a wonderful Easter Sunday!
blessings,
kari & kijsa
Glad to be introduced to your site! Love love love your color choices. And your sewing is such an inspiration. Hope you had a wonderful Easter!
The Gahan Girls
another great projeect! yes i am ready for spring here too!
BEautiful project! We’re about 90 miles west of you and had snow yesterday. Just flurries but I can’t remember a time that it snowed on Easter! Blessings… Polly
Tooooo cute!!!!
Love it Lisa!
xo,
Kim
What a wonderful project! And what a lovely blog you have!
Thank you so much for stopping by to visit. Happy Spring!!
Lisa, i just love that! The colors and composition…where did you get that great vase?
Penny
What a fantastic project!
Kind regards,
Sonnja
Beertje Zonn
Oh I LOVE this project! This is something I could actually do(except maybe the stitching part as I don’t have a machine….yet).
Thanks for the inspiration! :o)
This rocks! I will have to see if I can find one so I can make this.
what a great project. polka dots are great, of course, but i love that faded green color. we’re watching the buds on our trees with anticipation…spring…come…soon…
WHOA, tons of people here checking out this awesome project! It is so springy, I love it!
Happy Night, Lisa!
Wonderful as always Lisa! The colors and balance are spot on. I agree. Stitching on paper adds that extra special “something”. I have not seen that vase before – so it really is a unique piece. We got snow last night {insert pout} – I wonder if Spring will ever arrive! I’ll just come gaze at your vase and think Springtime thoughts :~)
what a beautiful and fun spring project!
Beautiful, as always. Thanks for the tutorial.
Love this project Lisa, so fresh! Just gorgeous!
Happy Spring!
Sheree
This is a wonderful!! Spring is here out in Northern California and I’m scrambling for vases and looking for projects just like this one. Thanks Lisa!!
Sabina ~
What a beautiful decor! I loved it!!!
Such a fresh cheery project…It’s like the smell of grass after it rains.
Oh, what a special and wonderful Idea!! How do you come up with all these great ideas, I wanna know!! :)) And as always you explain it all so very good, and your pictures are excellent too.
I think Spring bring the best out of us all. Happiness, love and also creativity. Yesterday I woke up to singing birds, that is just the best wake up ever!
I hope you have good days Lisa!
Hi Lisa! Oh My goodness your posts are absolutely wonderful! I am just checking in after a while of not posting or reading much..I was just crazy busy!! I am so excited to come and see all of these gorgeous projects on your site, I cant wait to read them! You’ve got it going ON! 🙂
Love your vase! Very easy tutorial to follow. Thanks
Sewdelish
I just recently found your blog in Romatic Homes. I LOVE your site and your projects are wonderful!