
As we head into Summer, assorted florals are already popping up all over, in window boxes, gardens and yes, in baking.
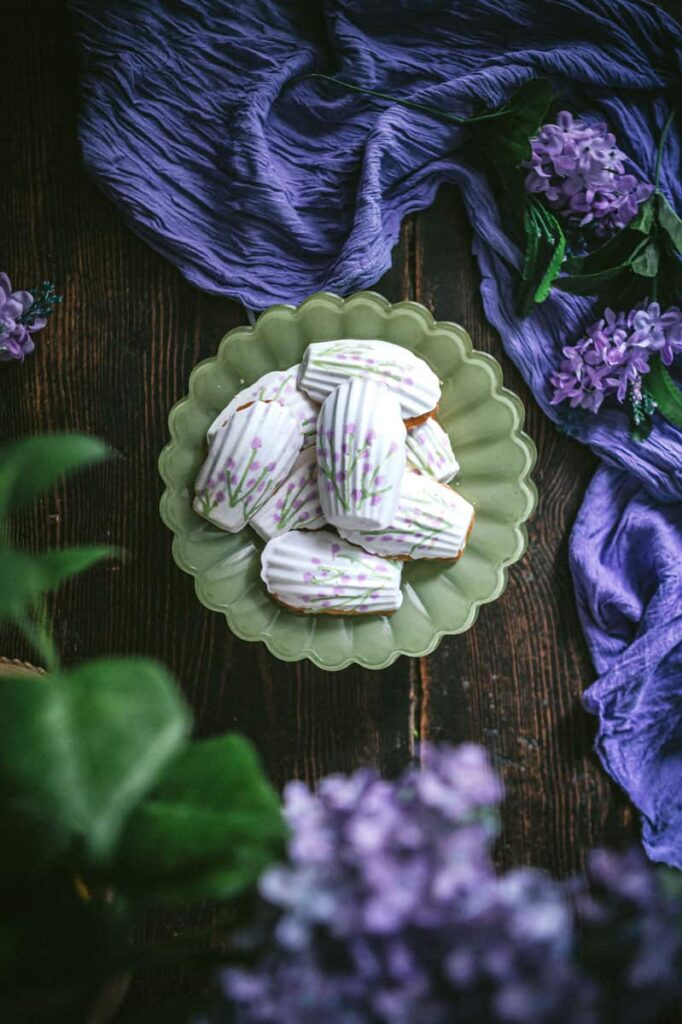
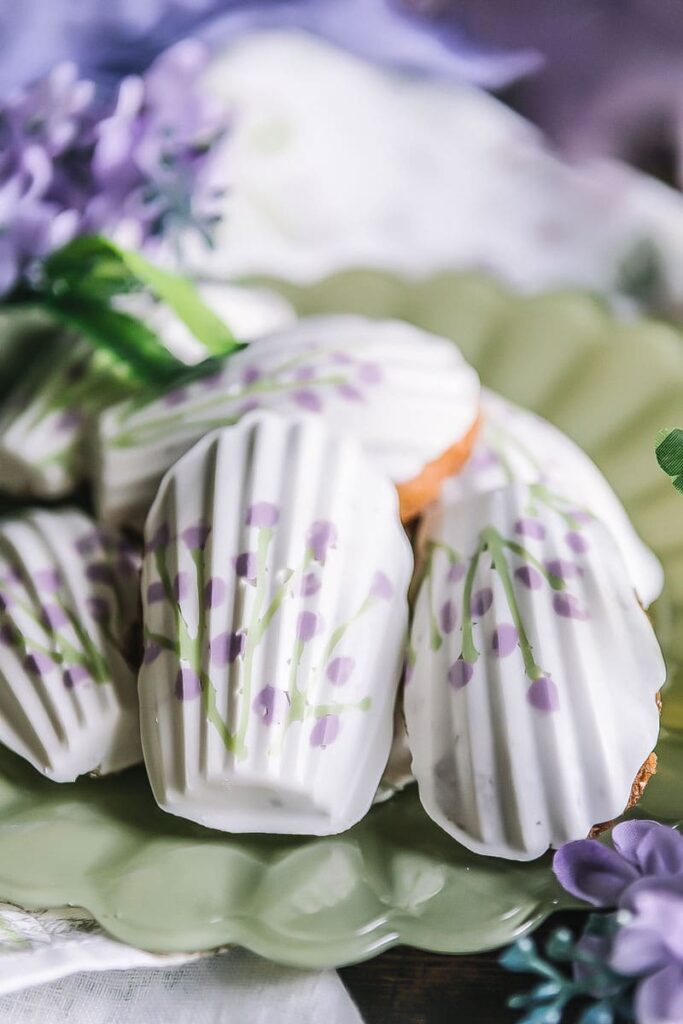
The pretty florals I’m focusing in on today are painted with chocolate and embedded in the Madeleines.
This version is a fun elevation of the traditional French cake in even tastier form.
Madeleines are known for their distinctive shell shape.
They’re delicious as-is, but can taste even better with a thin layer of chocolate that also captures the ridges of the distinct madeleine pan design.
Throughout this post, you’ll see just how easy it is to add even more whimsy to these delicious bites, with embedded floral designs.

Madeleines walk the delicate balance between a cookie in terms of size and a cake in terms of texture with it’s tender crumb and slightly crisp exterior.
They’re light and airy with a signature little hump on the underside. You’ll know your Madeleines are baked successfully when that little plump tummy develops in the oven.
I have some tips for successful madeleine making a bit further down in this post.
Just Chill
This recipe needs to stints in the fridge for success.
It’s important to chill the batter for at least one hour before using. You can also allow the batter to sit in the refrigerator overnight.
After filling the prepared (buttered and floured) madeleine pan with batter, place the pan and contents in the refrigerator to cool for about 15-20 minutes before baking.
The contrast between the cold batter and the hot oven creates steam pretty quickly and that helps to lift the center of the cake which leads to a better development of that signature hump.
After the madeleines are baked and cooled completely, you can focus on the chocolate decorating.
You can always just add a dollop of melted chocolate in the Madeleine pan to create a covered cake with no pattern, but the tiny floral design just adds an extra touch of whimsy.
It doesn’t take much more time to add the florals, and I think it’s worth it.
Use a small paint brush and assorted colors of melted chocolate to carefully paint a floral pattern directly onto the cooled madeleine pan.
Then, drop melted chocolate into the pan to cover the floral pattern just created. Before the melted chocolate hardens, gently press the baked madeleine cake, ridged-side down, into the chocolate and allow it to harden before gently lifting the cake off the pan.
The pattern painted adheres to the melted chocolate and once the cake is lifted, the entire floral pattern comes with it.
Food in Motion
Meanwhile, I continue to work on my food-on-the-move videography series, and I’ve included my latest Food in Motion video below, featuring these Chocolate-Dipped Madeleines for your viewing pleasure.
You can watch the video fullscreen within this post, or you can click over and watch it full screen over on YouTube.
If you opt to watch this video on YouTube, please consider subscribing to my channel, as I continue to try to grow my audience on that platform too.
Chocolate-Dipped Madeleines
Equipment
- Madeleine baking tray
Ingredients
- 2 eggs
- 1/2 cup granulated sugar
- 1 tsp vanilla extract or paste
- 1 tablespoon honey, optional
- 1 cup all-purpose flour
- 1 teaspoon baking powder
- 1/4 teaspoon salt
- 1/2 cup unsalted butter, melted
- 1 zest from one lemon
- 2 cups melted chocolate (single color, if dipping only)
- additional assorted melted chocolate for decorating
Instructions
- Beat together the eggs and sugar until pale and fluffy.
- Sift dry ingredients flour, baking powder and salt and gently fold into the egg mixture.
- Add the melted butter, vanilla and lemon zest.
- Cover the batter with plastic wrap and refrigerate for at least one hour. You can also refrigerate the batter overnight.
- Preheat oven to 375 degrees when ready to bake.
- Prepare madeleine pan by brushing it with melted butter and lightly dusting with flour.
- Place the batter into a piping bag with a wide tip for easier dispensing into the pan.
- Pipe the batter into the madeleine cavity about 3/4 full, and place back into the refrigerator for about 10 minutes.
- Bake for 9-12 minutes until you see the edges are golden brown.
- Remove from oven and allow to cool on a baking rack.
- Melt a small amount of chocolate in assorted, desired colors.
- Make sure madeleine pan is clean and completely cool before moving to the chocolate step.
- Use a small paint brush to carefully paint flowers in each cavity of the madeleine pan. Work quickly because the chocolate will harden fast. If it hardens before you're done painting, just pop it back in the microwave for a few seconds to soften back up.
- Allow the painted chocolate to harden completely before moving to next step.
- Melt about 1 cup of the base color chocolate, and pour the melted chocolate over painted design. Fill the cavity by half and immediately place a single madeleine right on top of the chocolate.
- Press gently, until you see the melted chocolate peeking out from sides of the cakes.
- Again, work quickly because the chocolate will harden quickly.
- Allow the cakes to sit in the chocolate for about 15 minutes to harden completely.
- Gently remove cakes from pan. Work carefully to remove the cakes because the chocolate edges are fragile.
- The painted design will be embedded in the chocolate. Serve and enjoy.
Tips for Madeleine Success
- Make sure the batter is fully chilled. It helps to develop the flavor and helps that distinct hump to form.
- Also, chill the batter-filled pan. That thermal shock between the batter-filled madeleine pan and the oven will help create that signature little hump in the cake.
- Before baking, brush every groove and corner of the madeleine pan with butter and lightly dust with flour to prevent the cake from sticking.
- Do not overmix the batter or you may end up with a more dense, rubbery cake texture.
- Also, try not to overfill the pan, which can cause spreading and uneven shaped madeleines when fully baked.
Meanwhile, consider making these and gifting them to the cake lovers in your life. Size some parchment paper to fit a cookie gift box, wrap the box with a pretty ribbon and give these florals to someone special.
While I have your attention, please allow me to share something about this pretty floral apron. I made it.
A few years ago, my daughter gifted me 2-yards of this lovely linen floral fabric, which matched some existing placemats I already owned.
I only need a yard to make this beauty, which also includes a muslin lining. When ironing the raw muslin, I noticed it had a fringed edge, far too pretty to cut and toss. So, I used it to embellish the two front pockets of the apron for a little extra special touch.
If you love this fabric as much as I do, you can get your hands on the same print, HERE.
I think the dessert lovers in your life will enjoy seeing a plate of these coming their way.
I hope you’re inspired to give these chocolate-dipped madeleines a try.
Thanks for popping by for a visit.
See you back here next time.
xoxo
Leave a Reply