
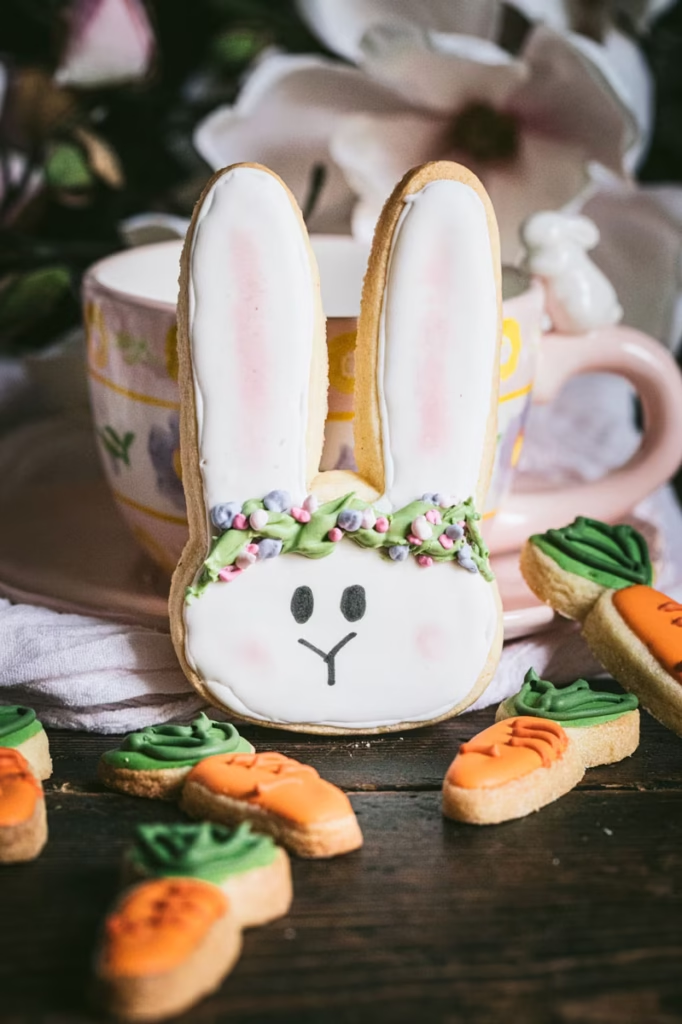
These bunny and carrot sugar cookies topped with delicate floral crowns are almost too cute to eat.
Their sweet little faces, paired with pastel blooms made from tinted icing add a charming, whimsical touch to these adorable cookies.
Throughout this post, I’ll share some of my favorite techniques for sugar cookie decorating, including a sweet video.
These adorable treats are as delightful to look at as they are to nibble, making them perfect for Easter baskets, dessert tables, or just spreading a little sweet joy to friends and family.
I haven’t made sugar cookies in a while and it was fun getting back into the groove of using tinted icing for delightful effects.
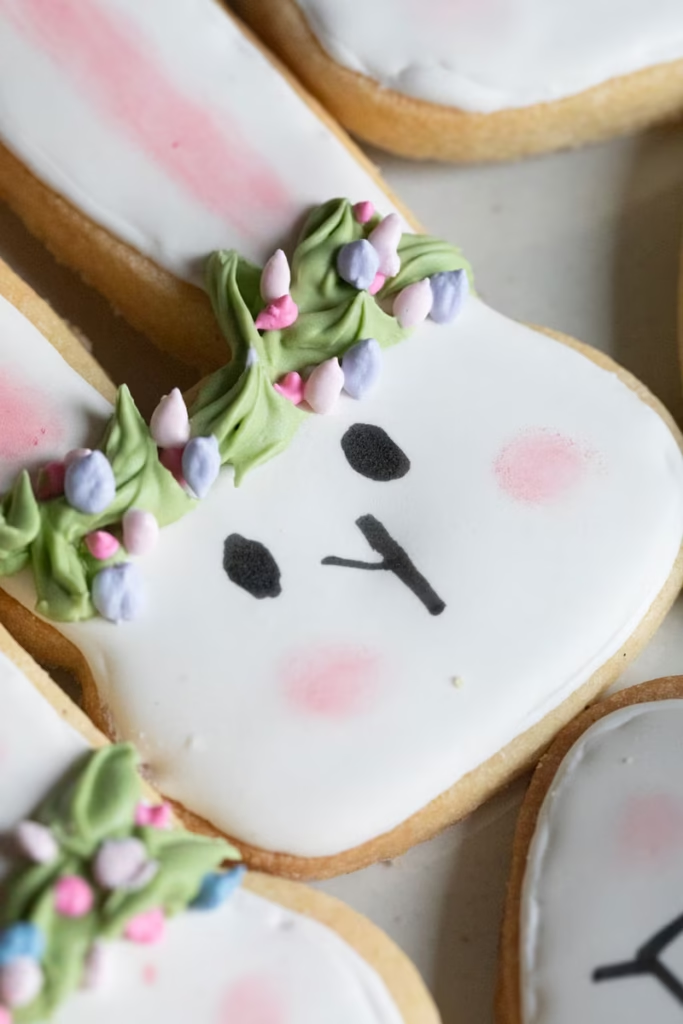
I absolutely love these cute little floral crowns and rosy pink cheeks.

There are plenty of ways to prepare the cookie dough but I like to freeze mine for maximum cookie cutter success.
First, cut the dough in half and roll it out between two pieces of parchment paper and roll it out to about 1/4-inch thickness.
Place each rolled out dough on two trays and place in the freezer and put in the freezer for about 45 minutes.
This will ensure the dough is nice and firm for cookie cutting.
After the initial freezing, I only freeze the rolled out scraps for about 10 minutes before continuing to cut the rest of the cookies out.
When the dough is super cold like this, it really helps the cookie keep its shape.
They stay pretty firm without breaking up or getting stuck on the cookie cutter.
After flooding the bunny shape with white icing, allow the icing to set even further by leaving them overnight in the refrigerator.
Once the icing sets, the cookie will not only be easier to handle but will also be firm and dry enough to for more detailed decoration, including with edible ink markers.
Be sure to work in good lighting too, so you can easily spot air bubbles or other boo-boos.
I used an edible paint powder to gently create the soft pink area inside the bunny’s ears.
This was super simple and I think the powder turned out much more precisely than if I had tried to create the interior ear shape with pink icing surrounded by the white icing.
I love this soft pink shade.
When coloring icing for an accent element on the cookie (like these horizontal texture lines on the carrots), I like to take the original icing and add a wee bit more of the same gel coloring to make it just a little darker.
This way the accent detail pops against the original color as you can see here.
I did the same thing with the green veining detail in the carrot top. It only takes a small degree of color grading to make a big impact on the detail of the cookie. It’s a subtle color change, but helps to add lovely texture and character to the cookie.
Meanwhile, I continue to work on my food-on-the-move videography series, and I’ve included my latest Food in Motion video below featuring these cute Bunny and Carrot Cookies for your viewing pleasure.
You can watch the video fullscreen within this post, or you can click over and watch it full screen over on YouTube.
If you opt to watch this video on YouTube, please consider subscribing to my channel, as I’m trying to grow my audience on that platform too.
Thanks so much for the sweet support and enjoy the video (and the recipes that follow).
Food in Motion
SUGAR COOKIE RECIPE
Ingredients
- 5 cups all-purpose flour
- 1 tsp kosher salt
- 2 cups salted butter, softened (*see note at bottom of recipe).
- 2 cups granulated sugar
- 2 eggs
- 4 tsp vanilla extract
Instructions
- Whisk the salt into the flour and set aside.
- Beat granulated sugar and butter until creamy. Don't over mix.
- Scrape down the bowl.
- Add eggs, one at a time and beat until just incorporated.
- Add vanilla extract.
- Add flour and gently mix until all is incorporated and a dough ball has formed.
- Divide dough ball in half.
- Roll out each half between two sheets of parchment paper. Place on a tray and freeze for about 45 minutes.
- Dip cookie cutter in flour and press shapes into dough. Gather dough scraps, re-roll between parchment paper and place back in freezer for next use.
- Repeat steps with other dough half. Re-freeze scrap dough for about 10 minutes.
- Bake cookies about 12-13minutes, until golden brown.
- Cool completely before decorating.
Notes
ROYAL ICING RECIPE
Ingredients
- 32 ounces confectioner's sugar
- 4 tbsp meringue powder
- 3/4 cup water, room temperature
- 2-1/2 tsp vanilla extract
- 4-1/2 tbsp light corn syrup
Instructions
- Mix the meringue powder and the water until bubbly and frothy in a stand mixer.
- Add all the confectioner's sugar and mix until smooth.
- Add the vanilla extract and corn syrup and mix until you get the desired consistency.
- Reserve some of the icing and set aside to use to thicken other colors later, if necessary.
- Determine what colors you want for your cookies. Separate mixed icing into the same number of bowls.
- Add desired gel coloring to each.
- Test the consistency for the desired decorations.
- Spray water to thin, or add more original icing to thicken.
Tips for Incredible Icing
Skip the whisk, use a paddle attachment A whisk attachment can add too much air to the icing and that could create air bubbles later. The paddle attachment is the preferred option.
Stiff peaks but don’t overmix The icing should be mixed until soft peaks form for a smooth and shiny consistency. Mix the icing until it forms stiff peaks, which should look thick and creamy, similar to softened cream cheese. Also, make sure the mixing bowl is free of any oil or grease which could prevent desired peaks to form.
Sift powdered/icing sugar Eliminate the clumps and bumps in the sugar before mixing to ensure that the texture will smooth.
A little water at a time. Add water slowly while mixing to achieve the desired consistency. I used a small spray bottle to add the water evenly and stir. Add more confectioner’s/icing sugar to thicken, add more water lightly to thin.
Keep icing covered Royal icing dries out quickly, so cover your bowl with a damp cloth or plastic wrap to prevent it from drying out while you’re working and mixing up your multiple icing colors.
Recipe using corn syrup and meringue powder The magic ingredients are light corn syrup and meringue powder, which help to stabilize the icing and give it a harder (but soft to the bite) surface. These ingredients will help create more consistent icing. That will translate into icing that holds up and firms up well.
Useful Tools for Decorating
- Small paint brushes I have a dedicated set of tiny paint brushes to use for decorating cookies. A small brush is the perfect tool to use to gently apply the pink edible powder to the bunny ears. And using a brush makes it easy to apply a small amount of color or build up a darker shade more precisely. You could also use a Q-tip to achieve the same effect.
- Edible ink marker Another useful tool to provide easy, quick color to the finished cookie. I was initially going to pipe black icing for the bunny eyes and nose, but changed my mind to the much easier option of just coloring in those features with the marker. The markers come in multiple colors and tip thicknesses.
- Edible powder dust Sometimes, all you need is a little pop of blush, like the cheeks on these bunny cookies. This is where powder dust comes in quite handy. It applies easily and provides a light touch of very understated and subtle color. It’s also easy to layer and build up for a stronger hue.
- Gel food coloring I prefer using gel colorings because they’re thick and don’t add additional liquid to the icing. I also find it easier to build gradations of icing color using gel, because the coloring is so much richer and nuanced, as opposed to standard liquid food coloring.
- Piping tips It’s always nice to have an assortment of piping tips for cookie decorating to create various shapes to create intricate designs and lines on the cookies. I used piping tips to create the flower dots and the green wreath part of the floral crown.
- Scribe tool This is a sharp, point tool used for popping air bubbles in the icing. It’s also good for helping to redistribute icing around the cookie itself and pushing the icing into corners or other areas of the cookie.
When piping the floral crown, I used a leaf-piping tip Wilton tip #349, in order to achieve the whimsical wreath base. And for the multi-colored flowers, I used Wilton piping tip #3, which creates little dots.
The eyes and bunny nose were drawn on with a black edible ink marker. I think the next time I make these, I’ll use the marker to give these beauties some eyelashes.
These bunny and carrot cookie cutters are from Brighton Cutters and you can find them online, HERE.
Also, you can see some of my other sugar cookies from previous posts from the following links:
These were really fun to make and even more enjoyable to gift to my neighbors, my hairdresser and several family members. You can’t go wrong with an edible gift like this.
They bag up beautifully too, and the carrots fit perfectly inside those slender pretzel baggies that you can find in the baking aisle of your local craft store.
Add a pretty ribbon and personalized gift tag, and you’ll have a boutique-worthy offering.
I hope you’re inspired to make these Bunny and & Carrot Sugar Cookies.
Thanks so much for popping by.
See you back here next time.
xoxo
First off… thank you for making it possible to X-out of the ad’s section so we can see the whole blog you have posted. So many have a header and an ad’s section and just a small slit to see the blog. There are several I don’t look at any more because of that. Also, thank you for always having such a wonderful blog. I enjoy all the things you post and have for a very long time. Bless you!
Thanks so much for your kind words, Rita.
So glad you’ve been following for so long.
I hope you give these cookies are try. They’re so much fun to make. I’m already planning my next batch-lol
Happy day to you.
xoxo