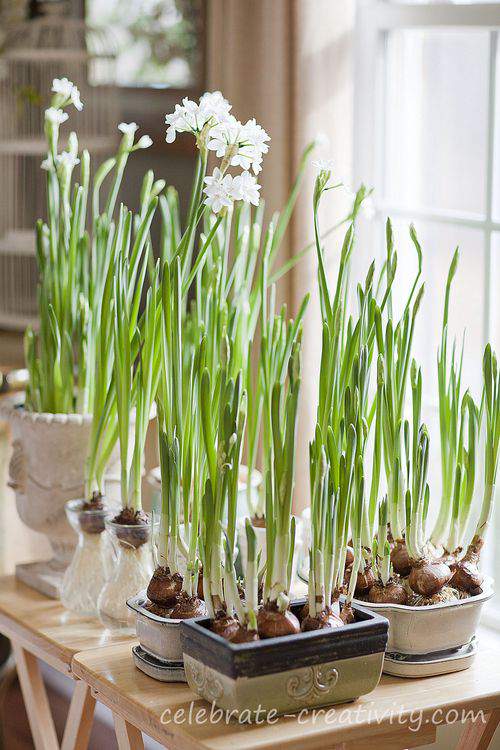
If you find yourself longing for an early Spring these days, perhaps this post will help a bit. It’s too brisk in most parts of the country to dig in the dirt outside but that doesn’t mean you can’t still tend to a garden indoors.
Consider growing a garden of Paperwhites in front of a well-lit window to add some Spring color to those drab Winter blues.
Welcome to part 2 of my series on how to grow a paperwhite garden.

Welcome to Part 2 of my Winter gardening series on How to Grow a Paperwhite Garden.
Throughout this post, I’ll share more photos of my first-ever Paperwhite effort which bloomed beautifully.
I don’t even have a green thumb and trust me, you don’t need one either.
Allow me to recap a few basics for those who may have missed reading Part 1 of this Winter gardening series.
First, you’ll spot a tiny bit of growth on the tip of the new Paperwhite bulb but that’s nothing compared to what you’ll see after just a few short weeks.
I decided to plant my bulbs in pebbles which is pretty darn simple.
You’ll need a water-tight dish (NO drainage holes) or pot with at least a 3-4 depth to accomodate the roots.
It’s OK to plant the bulbs very close together and make sure you keep the bulbs moist by watering regularly without flooding them.
Paperwhites love water and soak up a ton. However, too much water could cause rotting so pace the water schedule.
Here’s what the root system looked like after just a few weeks.
The fast growing roots are exciting to see, even though they do look a bit like long, white worms.
The nursery where I purchased my bulbs suggested that adding a 5% alcohol solution to the water will keep the paperwhites as much as one-third shorter.
The following ratio was suggested: 1-part gin or vodka to 7-parts water or 1-part rubbing alcohol to 10 parts water. No beer or wine.
I didn’t use any alcohol on this group of bulbs but I may give it a shot (pun intended) on my next round of Paperwhite bulbs.
As the roots grow down below, so do the stems up above.
The original stem curl in the new bulb is transformed into layers of stems that begin to stand straight up and tall as they reach for more space and light.
Once the roots begin to emerge, move the pots to a window where they can get good exposure to the sun.
Paperwhites love direct sunlight and these fast growing plants do have a tendency to get quite long and leggy.
While my garden was growing, I realized one of the pots was leaking so I had to replant a few of the bulbs.
This was a chance for me to get a good look at the root system.
I think the roots are pretty amazing.
It won’t be long before the first breezy, light blooms reveal themselves.
One morning, not long after they’ve been planted, you’ll come into the room where the Paperweights have been sleeping and you’ll find beautiful, glorious blooms.
The explosion of blooms is quite a sight to see.
Paperwhites bring such a sense of early Spring into the drab Winter days with their soft color and their equally soft fragrance which fills the house.
After they bloom, you’ll smell the Paperwhites as soon as you walk into your home.
By planting the bulbs so close together, you’ll grow a nice thick garden.
I think this is a great look when Paperwhites are thick like this but they also look quite pretty when planted solo.
As you’ll see in the next few photos, these dainty flowers are also quite versatile and can be incorporated into home decor in just about any room in the house.
If the stems are too long and leggy they may start to bend over.
You can support the Paperwhites with small plant stakes or you can use a pretty bow to tie them together to keep them upright.
As you can see, a pretty ribbon can be both fashionable and functional.
If you have large glass vase, considering using it to give your Paperwhite bulbs a home.
I think this is a fun look in my family room.
The roots will burst through the pebbles and intertwine all the way around the entire glass.
Using a container like this is a great way to watch the Paperwhite grow from both ends of the bulb.
Don’t forget, you can also grow individual bulbs.
Set up a trio of single bulbs to soften the corner of a a fireplace mantel.
Paperwhites are just an all-around beautiful addition to any area of your home.
Yes, it’s Winter outside but inside… it’s beginning to look a lot like Spring.
So are you now ready for an early Spring?
If so, I hope you’re inspired to grab a container of pebbles and a handful of bulbs.
Mary, Mary, quite contrary… do let me know how your Paperwhite garden grows. ♥


Beautiful! One day I will get my act together and do this.
The paperwhite bulbs that you gave me for Christmas now have stems two-three inches tall. They are thriving very nicely in my kitchen window. Thank you.
Oh my goodness! Those paperwhites are stunning!!! I love them. Thanks for the beautiful inspiration!!
Hello! I came across this gorgeous post on Pinterest. I wanted to let you know I featured a couple of your photos in my blog post about Winter Decorating with Paperwhites. Here is the link to the post. https://followtheyellowbrickhome.com/winter-decorating-with-paperwhites/
I hope you enjoy it! You have a beautiful blog!
Hi Amber, I’m glad to know you’re inspired by my paperwhites.
I love paperwhites and they’re among my favorite flowers because they’re so easy to grow.
(But they sure do stink when they’re done blooming, don’t they? lol)
Happy weekend and indoor gardening to you.
HELP! My paperwhite stems are way way too long! It’s Nov. 28th, what can I do? They haven’t started to boom yet…
Greetings, Debra.
I’m sorry to hear about your Paperwhites.
I’ve had my share of leggy stems too.
I’m not an expert but the legginess may have to do with a room temperature that is far too warm and they may not be getting as much light as they prefer. It’s a bit of a tricky balancing act.
Last time my stems got too leggy, I just supported them with wooden skewers (you can find at any grocery store) and gently tied them with dental floss. That may help keep them from toppling over while you try to force them to bloom.
Having said that, I’m not experienced with force-blooming but you may be able to search online for the best practice for that.
Good luck and happy holidays.