T
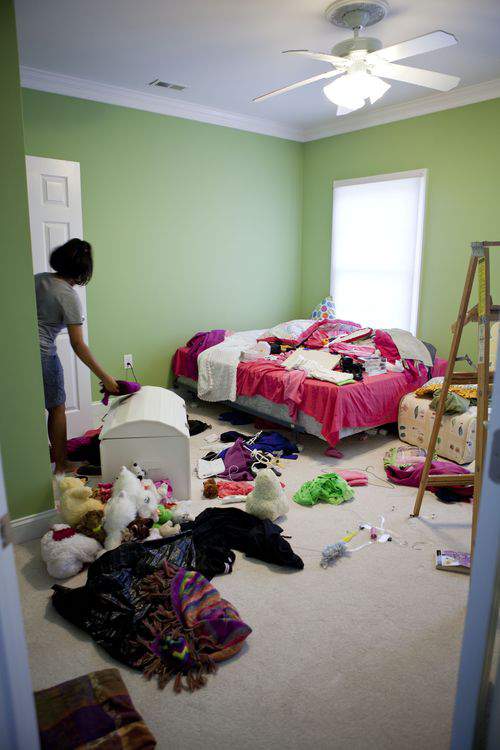
he title of this post may seem a bit misleading because the room in the photo below is anything but clean, crisp and clutter-free.
This is how Cameron’s room looked not long ago after we first purged her closet of everything unwanted and outgrown.
She was also packing for an end-of-summer trip so the timing was ideal to tackle a girl’s room makeover.
Of course, a 12-year old girl is determined to make her room look like she wants it to look. Is there a manual on pre-teen vs. mom negotiations?
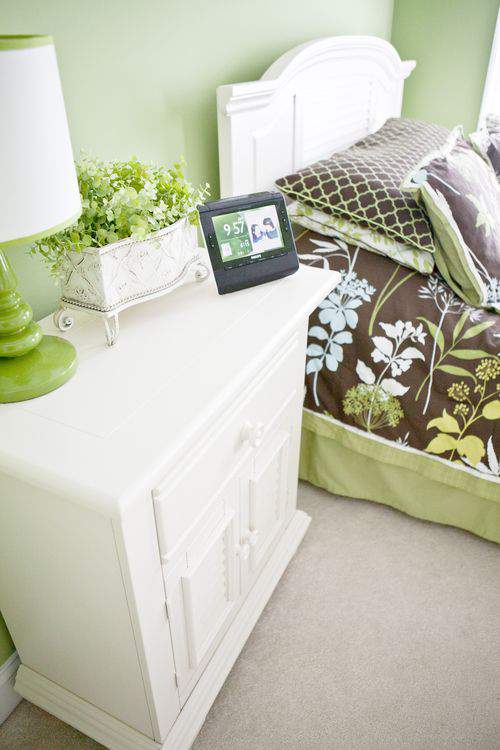
We had a minor (OK, major) debate on room color and finally agreed on this crisp green.
It’s called Woodland Hills Green (#543) by Benjamin Moore.
This set in the photo below is what I wanted. I just love the mod, funky color combo which I think is perfect for a young girl.
Unfortunately, Cameron hated it.
Cameron has a great interest in environmental issues and she insisted she wanted more “earth” colors including browns and sky blues.
Since I was able to talk her out of free-handing blades of grass on her newly painted walls (a win for me) I relented and agreed to go with her choice in comforter.

With the comforter issue resolved, my goal became trying to come up with window treatments we could both agree on.
Throughout this post, I’ll show you how I used an old window treatment to create a new look for Cameron’s windows.
I started with this upholstery fabric which I’ll admit was a bit too heavy for the project, but at least this was a perfect color match.
I’ve never made fancy window treatments before so I decided to duplicate some old swag and jabot window treatments that I had boxed up in my basement.
These used to hang in a sunroom in our first home about 16 years ago. I hung onto them, thinking I might use them again one day.
I never expected to use them as a pattern.
It was easy to de-construct the old window treatments. Use a flat head screwdriver to carefully pull the staples from the board.
From there, simply unfold everything and set each piece aside.
Iron each original piece so that it’s completely flat so that the pattern can be accurately duplicated.
Each section also has a lining. I used contrasting fabric for the jabots and white lining fabric for the center swag.
The sections of the window treatment look better with cording around the edge. Cording is also very easy to make.
Click here to see a video on how to make a continuous bias strip which molds easier around curves and corners in a design.
Once you’ve created the strip, place the cording inside and stitch.

You need a zipper foot for this step which allows you to sew very close to the edge of the cording.
Stitch as close as possible.
Sandwich the piping between the top fabric and lining and stitch to create the first jabot.
Turn over and iron for a crisp look. In this case I did not top-stitch above the cording because I thought it would make the edges even more stiff and inflexible.

Measure the width of the window and then cut wood planks to size.
I added two inches to the width of each board to give myself a one-inch clearance on either side of the window frame to accommodate the L-brackets needed for installation.

Next, use a staple gun to begin covering the lower portion with desired fabric.
Leave the top portion of the fabric open for now.
I used plain white lining fabric for the bottom of the swag portion.
With the original floral window treatment as my guide, I duplicated the folds in the fabric for the center portion.

Staple the swag onto the middle of the board, dispersing the folds evenly from one end to the other.
This was a little tricky to achieve but don’t be afraid to pull up the staples and re-position the fabric to get the consistent look you want.
Fold the jabots and staple to them to the board as well, covering the corners of the swag that was just stapled.

Once the two jabots are secured, simply fold the top part of the board fabric down and then staple that toward the front of the board.
The L-brackets easily screw into the board right through the fabric.
If using a striped fabric like this, I’m not sure you can get the stripes to line up with a perfect horizontal presentation. I’m sure an overall pattern would not have presented the same problem.
I’ll just keep that in mind if I ever make any more of these.

Remember, the window frame is attached to studs in the wall so the area immediately surrounding the window is generally the most secure place to attach your hardware.
One end of the L-bracket is attached to the end of the board, and the other side is screwed directly into the wall (preferably into the stud).
Keep the staple gun handy because you may have to make a few fabric adjustments after installation.
NOTE: By the way, if you don’t have an old window treatment to use as a pattern, I found an easy tutorial on-line for making swags and jabots. Click here.
Here are the finished window treatments.
I like the way they turned out but I will say the next time I try this I will definitely use a more lightweight fabric.
When I first installed these window treatments, I couldn’t get the ends of the jabot to stay flat next to the window frame as you can see in the photo on the left. Notice how the ends flair out a bit?
TIP: Use a small piece of heavy duty, double-sided tape to bring the ends in closer to the window frame for a neater appearance as you can see in the photo on the right.
Because I had some extra fabric on hand, I decided to throw in a couple of long pillows for Cameron’s bed.
To create a quick, no-fuss pillow form, fold a few layers of quilt batting to represent the size pillow you want.
Cut two pieces of fabric about 1/4-inch larger all the way around than the width and length of the batting. This will give you a 1/4-inch seam allowance.
Pin piping in place between the top and bottom of fabric and stitch 1/2-inch.
Make sure you leave an opening along what will be the least visible edge of the pillow. Insert folded batting into the new pillowcase.
Once batting is inserted, simply close the open seam using a sewing machine or slip-stitch by hand.
Matching pillow construction is a good way to use up scrap fabric or over-estimated yardage.
For a long time Cameron insisted she didn’t want a headboard for her bed and we went along with it.
However, I found a great set on sale and picked it up while she was out of town visiting relatives, leaving no opportunity for any pre-teen debate about furniture.

Small, color-coordinated extras add a nice touch.
I’ve had this ivory container for years and I think it now works perfectly in Cameron’s room.
This trio of plastic bins are not only a good color match but will also provide some additional storage for Cameron.

This stuffed gray kitty now has a permanent home on Cameron’s bed too.
It’s not as ideal as a real kitten, like the gray ones we found in our backyard tree earlier this year, but this little guy will have to do.
The picture below on the left is what the room looked like before Cameron left for the summer visit with family and the one on the right is what she came home to a week later.
It’s hardly the same room.
Meanwhile, I’m still on the lookout for a decorative area rug that will make this room pop even more.
Of course, I’ll have to tread carefully (pun intended) on the rug choice because Cameron really wants to incorporate her own decorating ideas that reflect her taste and interests.
I think I’ve given her a good foundation to build upon with this easy makeover.
Stay tuned, I’ll share how I transformed Jordy’s room later in an upcoming post.
Meanwhile, fresh space is a great way to begin the new school year.
This room is finally clear, crisp and clutterfree. I just hope it stays this way. ♥
gi


I love the way you changed the room — very creative, and the colors look great! I also have a teenage daughter and know what you mean about agreeing on styles. Nicely done!
STUNNING as always!!!!!
Beautiful transformation! I hope she liked the headboard/footboard”, as I do!
It’s beautiful Lisa! Great job on the valances. I recently got a quote for valances in my kitchen — one valance, 150″ long, and they wanted $2500. After I picked myself up off the floor, I decided I’ll make my own. Thanks for the inspiration!
Her room and beautiful. I think she will really like it. And those window treatments are very very nice. You did a wonderful job on them. Retail on those are not cheap at all.
I Love how you used your old curtains as a pattern, sometimes we should trust our instincts and keep certain things because they can come in handy in ways we didn’t expect. The room turned out beautifully.
No kidding! Now there is a bed in there!!!! snicker snicker!
It looks beautiful!
Oh Lisa you are the queen of all creativity – Cameron’s room is just gorgeous!! I really love the bed pillows, and wish I had seen this before I gave all my poly batting away – I hated it for quilting but it would have been perfect for this. Maybe I’ll get some more….thank you for all the inspiration!!!
What a great room makeover! You’re extremely talented! Just never do what I did—-let my daughter paint her room purple, only to have her get married and move out a year later. Do you know how many coats of paint, including a good stain cover, it takes to cover purple??? Happy day!
I remember when I would take trips and my mom would take the opp to reinvent my room. I think you are smart for giving Cameron the chance to add her own touches! You are truly a DIY genius!
Nice work Lisa and Cameron. I am glad you were able to achieve a result that satifies both of you. Lisa: I like this better than the blue and silver flamingoes wallpaper that you insisted on when you were Cameron’s age. Best wishes, Nana Banana
Very nice!
WOW…that is such a nice room. Great job.
what fun to see the progression and all the little details!
What a wonderful transformation. Love the wall color and color swatches of fabrics. They blend so well.
Her room looks great.
Don’t you just love a staple gun? I use mine for all kinds of things, oh and can’t live without double stick tape. LOL
Can’t wait to see what kind of rug you come up with.
Have a wonderful long weekend,
Melissa
The room looks great. Does she like it? I think it’s important to let kids have some say in their rooms… My parents let me paint and decorate my room as a teen, and I am so glad. It’s the kids that have to live there, right? I know it’s your house, but pick your battles… unless the house is on the market for sale, I don’t think it’s so bad to let them have a bit of their own personality shine through in their room.
I love the room makeover! Very nice! The acessories are just wonderful!
Lisa, it turned out beautiful. The colors are so soothing. The window treatments were the hit of the room!
Adriana
Love that color green; I have it in my kitchen! How about a recycled rag rug that she can help you make (then its an heirloom she can bring to her first apartment!)
See here….. http://www.ragrugcafe.com/toothbrush-rugs-complete-video-instructions-part-1-beginners
Wow! This looks so good. Nice job!
Anna
I thought it was going to be some boring old post, but it really compensated for my time. Great Post..
I LOVE this room. I can’t imagine any pre-teen girl NOT loving this room.
Wow, that’s a nice room. It’s a little messy but I love the decorum.
Cameron and I has really same interest especially in the choice of comforter and with the earth colors that I also want to blend in.