
E
ven though summer is winding down, there's still plenty of time for end-of-season barbecues and outdoor gatherings.
Throughout this post I'll show you a fun and easy way to dress up your table for any upcoming soiree.

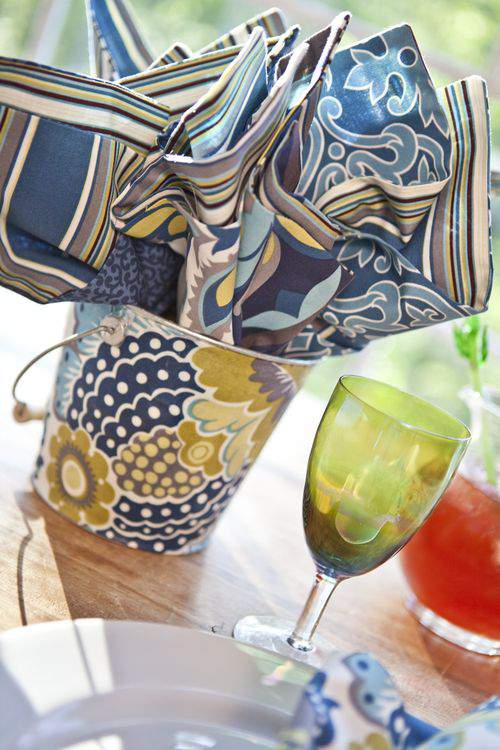
Your guests will be impressed with more than just the food you serve after they see these easy to make napkins, matching napkin holder and napkin rings.
Let's start with the napkin construction. You can make these with a stack of coordinated fat quarters from your local quilt shop.

You may need to slightly trim your fat quarters to make sure they're all the same size.
Each piece of fabric here was trimmed to 16-1/4 X 18-1/4 inches.
Because I used a 1/4-inch seam allowance that means that each finished napkin will measure 16" X 18".

Put the top and bottom pieces of fabric together with right sides facing.
Typically I would suggest you pin the fabric pieces in place, but these fabric squares are so small I didn't bother to use pins.

Stitch all the way around the fabric using a 1/4-inch seam allowance.
Leave a small two inch opening to turn the fabric inside out.
Stitch the open portion of the seam closed. You can top stitch all the way around the napkin at this point for a decorative effect, but it's optional.

Use a the pointy end of a knitting needle to gently poke out the corners.
I wanted the napkins to have a common thread, so while each one features a different fabric on top, I used the same striped fabric for the back of all of them.
Iron flat.

It's simple to tranform a plain galvanized bucket into a coordinated container.
You can find these small buckets at most crafts stores for about $3 a piece.

Most of the time, these small galvanized buckets contain a plastic lining to help make them water proof.
Simply remove the plastic, cut out the circular bottom and cut down the middle of the plastic so it can lay flat. This will give you a pattern to use to cut the fabric so it fits around the bucket perfectly.

Pay close attention to the length of the galvanized bucket between the top and bottom rims.
Since the plastic insert is generally slightly shorter that the bucket itself, you may have to add an inch or so to the cutting so the fabric will fit all the way around bucket.

After cutting the fabric to size, use Mod Podge (a liquid adhesive found at most crafts stores) and adhere the fabric to the bucket all the way around.
You can see how I covered a much larger galvanized bucket in a previous tutorial if you click here.
It's messy, but I find it easier to spread the Mod Podge with my hands so I can feel any lumps or creases in the fabric as it's being smoothed over the bucket.
Once covered, set aside to dry.

No handmade napkin is complete without a handmade napkin ring.
Start with these plain wooden spools which you can find at most crafts stores in the woodworking section.

You can maintain the natural wood color, cover with acrylic craft paint or choose to stain the spools as I did.
If spray painting, don't forget to make sure you have adequate ventilation preferably outdoor. The fumes from a spray can are strong and fill a room quickly.
It's best to spray outdoors.

I decided to decorate these napkin rings with these artificial hydrangeas to match the fabric used to make the napkins.
When picking out your artificial flowers, it's a good idea to take a few samples of your napkin fabric with you so you find a good match.

Cut the pieces from the larger stem and grab your glue gun.
I was also going to add ribbon to the napkin ring but changed my mind after I snapped this photo.

Run a line of hot glue along the half of the spool and quickly adhere the petals, stacking a bit as you go for lift and fullness.

Here's a look at the finished napkin ring. Isn't this dainty? I think this is so delicate looking.
Consider the variety of floral napkin rings you can create to suit any occasion or fabric choice.
Imagine how these sweet petals would look with ivory-colored spools and soft, ivory napkins on a pale blue tablecloth.
Perfect for a fancier event like a bridal or baby shower.

Slide the handmade napkin into the ring and you have a great looking presentation fit for any end-of-summer gathering.

These are all the napkins I finished in just one day.
If it hasn't occured to you already, a napkin set like this would make a beautiful housewarming gift. It's also not too early to start thinking of handmade Christmas presents.

There are so many uses for galvanized buckets.
You can click here to see an earlier tutorial on how I transformed a much larger galvanized bucket that I use for crafts supply storage.

If you're planning a large event, consider covering several buckets with fabric, filling them with handmade napkins and placing them in mulitple locations on the table.
I think you're guests will be impressed with such a creative table setting.
Who knew that a drop in the bucket could make such a big splash? ♥
**CHECK OUT ONE OF MY FAVORITE CRAFTY LINK PARTIES AT TODAY'S CREATIVE BLOG.
Ooooh….just gorgeous Lisa! I love that your napkins are two-layered — making them more substantial. I love the hydrangea napkin rings too — VERY pretty. And that pail is perfect — thanks for the tip on how to get a pattern, I always struggle with that part. (And just to prove that I DID read the instructions, did you mean 16 1/2 x 18 1/2 for the cut out sizes?)
Oh Lisa you ALWAYS do the CUTEST things!! Love the ideas, and the fabrics and colors you used are so beautiful! What a clever gal you are!! I’m still wanting to make one of those cute little black Raggedy Ann dolls like you made!! Hey how is the book proposal going? Sign me up for the first copy!!!
Blessings,
Charmaine
Great tutorial Lisa! I love the napkins, they look so “finished” with them being double sided. And I have used my fingers too when applying Mod Podge! Gets all those bumps out and you are going to get your fingers messy any way 😉
Stunning as always!!!
The colors and fabric you used are beautiful. How clever to use the plastic lining in the galvanized bucket as a pattern! I love to make napkin rings. I have made far more than I can possibly use!
http://mel-designs.typepad.com/my-blog/2011/03/fancy-clay-floral-napkin-rings.html
http://mel-designs.typepad.com/my-blog/2010/09/shadowbox-napkin-ring-tutorial.html
Keep up the great work Lisa. Your tutorials rock
You truly are creativity in all its forms.
Lisa, I just found your blog last night and spent today reading every single one of your posts. Omagosh! You rock! I love that you do all crafts. And I love your quilts. I’m a novice quilter, but you make scalloped edges look easy. I might have to give it a try. Keep blogging and inspiring! Hugs, Michelle
Love how everything coordinates so beautifully! Great idea!
These are just gorgeous! I absolutely love the colors. I found your blog via Today’s Creative Blog….I can’t wait to look around some more. I already subscribed!
Hi Lisa,
Thank you for dropping by my blog to say hello, it was lovely to hear from you.
I’m always amazed at the lovely inspiring ideas you come up with, the table decoration is so elegant and now I’m going to spend some time catching up with your other posts too.
I’m currently working on a new website which is why I’ve been a bit quiet but will keep visiting here, it’s always so uplifting.
Susannah
What a great site. I love all the ideas on here and look forward to seeing many more. my family loves to host parties and you have the perfect ideas. Love it!!
Lisa,
I love the idea of making coordinating napkins out of different prints. What a great way to use some of those fat quarters that I keep “collecting”!
I love all the ideas on here and look forward to seeing many more. My family loves to host parties and you have the perfect ideas.
Great! I really love it. Thanks for sharing this posts. I hope to see more next time.
Wow! Those table napkins are just cute and adorable! Thanks posting these wonderful shots!
a napkin set like this would make a beautiful housewarming gift. It’s also not too early to start thinking of handmade Christmas presents.