How many of you own a Rubik Cube? Even if you don't have one, I'm sure you're familiar with the popular multi-colored blocks that are a real puzzle to solve. I've had one for years and I still can't figure it out.
I've created a project that is Rubik Cube-like and you're going to love it. Instead of colors, this game features images that are close to your heart.
This is also one puzzle you may find infinitely more fun (and perhaps easier) to solve.
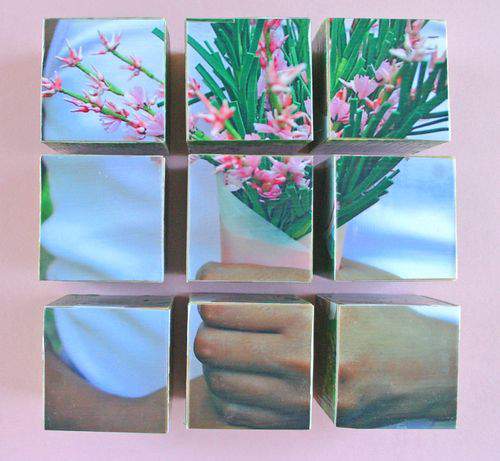
This fun photo block set operates on the same principle as the Rubik cube. In this project there are nine, 6-sided wooden blocks.
Each side gets covered with a different portion of a select photo which ultimately amounts to six different photo puzzles to solve.

This project requires few supplies including six favorite photographs and (1) Clear grid ruler, which is typically associated with quilt related measuring, (2) Decoupage solution like Mod Podge, (3) foam brush, (4) Exacto knife and (5) wooden blocks.
If you can't find the wooden blocks at your local scrapbook store you can order them on-line here. All other materials can be easily found at most crafts stores.
Because the blocks have six sides, each side needs to be covered with a separate photograph. You can use six of the same photo or mix up the photos to your heart's content.
If the photos I used for this look familiar, you may remember seeing them in an earlier post featuring an apron project I made from an old dress.
Tip: If you select six photos all from the same photo shoot you'll end up with similar photo colors on the various block-sets and the arrangments may end up being more challenging (in a fun way) to solve.

Place all the wooden blocks closely together and measure the area using the clear grid ruler. In this case the blocks create a perfect square measuring 4.5 inches by 4.5 inches.
This means your photos must also be 4.5 inches by 4.5 inches.
You can always use large photos and cut them down to size. However, in order to retain most of the intended image, I think it's better to resize the photo using photo editing software.
Most photo editing programs will allow you to customize the size of your photo. In this case I set the print size at 4.5 " x 4.5" for each of the six photos.
Using square photos can distort the image slightly because most standard size photos are rectangular. Because of that, you may end up clipping an important area of your photo when you resize into a square format.
To compensate for this, you may need to crop the photos before sizing them.
Take a look at the two sets of photos below. Both sets represent the exact same photos but because of the square 4.5 X 4.5 inch format in photo set A, an unacceptable amount of my subject's head was chopped off.
To correct this, I used the editing software to crop the original photos higher in the frame so that more of the top of Cameron's head would remain in the shot when resized into a square as you can see in the photo set B.

After printing each photo, use the clear grid ruler and your exacto knife to cut each photo off the sheet and down to 4.5" x 4.5".
These clear grids come in all sizes and are typically found in the quilting section of your local crafts store. The clear grid is perfect for projects like this because you can see exactly where your cutting lines are located.
Next, measure each individual wooden block. As you can see in the photo below, the single block measures 1.5" by 1.5".
This means that the 4.5" photos will ultimately have to be cut down once again into 1.5" x 1.5" squares to cover each of the block faces in the wooden formation.
Precise cuts are very important so watch those grid-line guides carefully as you cut your strips and squares with the exacto knife.
First, cut the photo into 4.5" x 1.5" inch strips.
Then cut those strips down again into 1.5" squares to perfectly match the wooden blocks.
Place each photo square on top of the block formation, making sure to maintain the correct image placement as you proceed so it's clear you're working with the correct photo pieces.
Tip: Pay close attention to the photos as they are being applied to each set of wood faces because it's very easy to get the tiny squares mixed up.

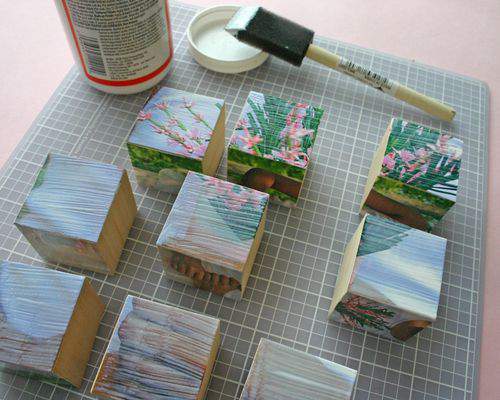
Use decoupage solution to thinly coat the top of each block and arrange the cut photos on top of each wooden square. Again, watch your photo arranging in order to maintain the integrity of the photograph.
Once all pieces are securely in place, apply another thin coat of decoupage solution on top of each photo block. The solution goes on milky but will dry clear.

Allow a short amount of time to dry and then turn each block to completely reveal a new set of blank wood faces. Repeat the cutting and application process with photograph #2.
Repeat each step for the remaining wooden steps making sure to allow sufficient drying time between each photo application to each face.
Note: After completing each face-set, it's OK to turn the next set of blocks in multiple directions.
To really increase the puzzle solving difficulty, make two of your six photos the exact same shots. This will make that particular photo even harder for the puzzle-solver to piece together.

Once all the blocks have been completed, apply several additional, thin coats of decoupage solution. Allow blocks to dry completely between each application.
You can also lightly distress the edges of each block with a craft file for a slightly, worn look. If you do this, add a final coat of decoupage glue.
Advisory: These blocks and the decoupage coating are NOT baby safe.
You should only put the finished blocks into the hands of older children who know better than to put them into their mouth.

This is fun way to preserve any special occasion or memorable event. A block set like this would also make a great gift.
Consider making a set using photos from a new baby photo shoot, wedding, family vacation, baby shower, birthday party, extra-curricular activity or favorite pet just to name a few.
I'm sure you can think of plenty of special photos in your possession that would be perfect for this project.
If you make a set of blocks as a gift, don't forget to include small copies of each of the photos as a visual guide for potential puzzle solvers.
Drop the blocks into a small tissue-filled gift bag and watch the recipient's eyes light up when these fun photo blocks come tumbling out.
Puzzle solving (and gift giving) has never been so much fun. ♥


Clever and a great gift for puzzle lovers.
What a neat idea! I am definitely going to make one of these for my son and daughter-in-law who just had a baby girl three weeks ago. How cute will this be on my son’s desk! Thank you for the really cool idea!
What a fun project Lisa! Thanks for the great idea!!!
Brilliant! This is a wonderful idea!
I love this! Hmmmmmmm lol
Wonderful idea. But, I know myself to well to get something like this started… But my daughter will be 4 on Friday, perhaps someone will be nice enough to bring her such a gift? *crossing fingers*
You always come up with the most creative and wonderful ideas, Lisa.
Yippee! It’s the 1st of the month and Lisa has posted a new (and fabulous) project.
I love the 1st & 15th! Thank you Lisa for another very cool project! I can’t wait to do this for some friends that have a child turning “1” in May!
Hugs,
Debra
This project is fabulous! I love the variety of pictures you used, and the colors are wonderful too. I can see my brother and sister loving this for their daughters.
Thanks for posting this Lisa, cool idea! May be I can get it togther and made by Fathers day.
I saw the first picture, a tiny part of the second picture and had to jump down to comment. I have a few blocks among my stash of items and if the stores weren’t closed, I’d grab my keys…Now let me go back and read your full post. Thank you, thank you, thank you!
How incredibly wonderful! I have people in my family who are into cooking/baking and scrapbooking. I have recently started a blog and put you as one of my most “endeared”. I also plan on sharing “how to” tutorials, recipes, patterns, ideas, etc. You are an inspiration! Love, Karen from Pieces of Dreams and Karensgardencottage!
Your blocks are BEAUTIFUL!! BEAUTIFUL!! BEAUTIFUL!! I’ve been wanting to make some for so very long… you’ve just pushed me over the egde. Wouldn’t these make the perfect gift for anyone??? Thanks for sharing!
I LOVE this idea. Thanks so much. I think these may have to go in our Easter baskets.
What a great idea! I remember similar puzzles from my youth, but to add pix of family is such a great twist. Uh-oh, more art supplies: I’m gonna get myself an Omnigrid!
~~JB
you always have the most fabulous ideas!!! This is so cool. I hope things are great wtih you! Happy spring!
♥ emily
Lisa, Thanks again for such a comprehensive tutorial! I always learn something here!
your daughter looks adorable. lovely pics! love it! and you have an axcellent ideas. love your fan photo box too. awesome!
Sounds like a great idea.
And it looks fun too.
Nice article…..I really impressed while reading your post…..Thank you so much , it will useful to every one….
thanks for sharing this information! it’s very useful for a lot people try to understand how we can use this product.
that’s really a fantastic post ! added to my favourite blogs list.
This is such a good idea as a craft for children at home or at pre-school grades. It is a way of creating something fun out of a photograph and I’m sure that children would love playing around with the blocks and then finding the right ones to join in the right order to form their picture. It can be done with specially printed family photos in the form of a square by cropping the pictures or resizing them. There are so many quality photo printing sites on the net nowadays, that you would surely find the right one to print the photo and then play around with it. Great idea and well-explained.