- 6 lbs topped and chopped strawberries
- 6 cups granulated sugar
- 2 medium Granny Smith apples, peeled and grated
- 4 tbsp lemon juice
-
Place clean mason jars and caps into a large canning pot and bring to a boil. Turn down the heat and allow to simmer for about 10 minutes.
-
This step also insures that hot jam is ultimately poured into hot jars.
-
Thoroughly wash, top and cut strawberries.
-
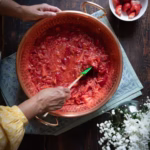
Use a potato masher to mash and mush the strawberries.
-
Peel and core apples. Grate them and add to the mashed strawberries.
-
Place a small saucer in the freezer for a set test.
-
Add lemon juice. Mix well and cook on stovetop on medium, continuously stirring.
-
Allow the strawberry mixture to develop a rolling boil and continue to stir.
-
Crank up the heat a bit and allow the strawberry mixture to boil for about 25-30 minutes.
-
During the boil process, the jam will rise bubble up in the pot and a pink foam will develop. Keep stirring to bring the bubble down.
-
Use a thermometer to determine the temperature of the mixture. Once it gets to 217-degrees, perform a set test.
-
Scoop a small amount of the jam onto the frozen saucer, and run your finger through it to create a small path. Place the saucer back into the freezer for 5 minutes. If the jam path is still clear, the jam is set and you can remove the saucepan from the stove.
-
If the jam is runny on the plate, boil the jam for another 5-6 minutes on high and repeat the set test.
-
Skim off as much of the pink foam as possible, or you'll end up with a very foamy jam.
-
Remove jars from hot water and place on a tea towel next to the jam pot.
-
Use the wide-mouth funnel to add the strawberry jam into the jar, leaving about a 1/4-inch clearing on top.
-
Once the jars have been filled, use a skewer or the air popper to run through the side of the jam to remove any air bubbles.
-
Place the mason jar caps on top of the jam-filled jars and barely screw on the rim with a very light touch.
-
Use the tongs to gently lower the jam back into the hot water and boil for about 10 minutes. Then, allow the jars to sit in the water for another 10 minutes before removing them from the water.
-
Set the jars on a tea towel and allow to cool. The jar rims will be very loose and once cooled, go ahead and screw the rims on firmly.
-
This batch will yield about a dozen jars but you can also cut it in half for a small batch.
-
Label jars to identify the contents and the date created.
-
Adorn and gift to the jam lovers in your life.